Two weeks ago I published a blog post detailing the creation of a Raspberry Pi based APRS tracker and Pi-Star hot spot. I’ve made a couple of enhancements since then and I thought I would share an update.
Going with a dedicated 4G connection
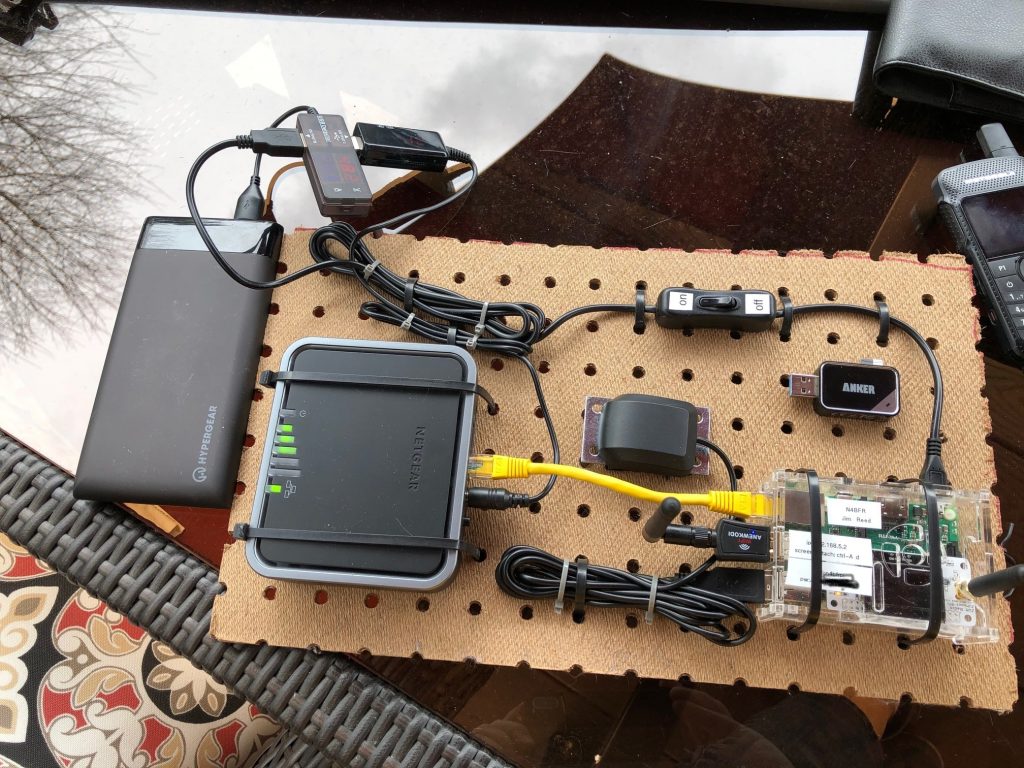
I had planned on using my mobile phone as my WiFi connection for getting packets into and out of the unit. During my testing, getting in and out of the car and having the Pi reconnect to the Wifi hotspot was not as seamless as I would like. So I added a 4G connection with a Netgear LB2120 4G Modem.
“Jim, why didn’t you get a Wifi modem?”
– Me to myself.
Why didn’t I? Well, I did want something I could directly connect to, and I though the device I purchased had wifi. But it didn’t so I made the most of it. I knew I wanted something with Ethernet so in the future this could go on my LAN so all is not lost.
Pi as a Wifi Hotspot
Another part of having a 4G connection was to have diversity of networks as I travel. I had a breakdown on the Blue Ridge Parkway last year and my Verizon phone had marginal coverage when I really needed it. I put this on the TMobile network, so I could make a quick Wifi call if I had to in a pinch.
Since the Netgear does not have Wifi, I added Wifi Hotspot functionality to the Raspberry Pi. It’s not what I would use every day for a Wireless Router, but it will work to do some configuration or make a quick call. I bounced around to different instructions as I customized this, so I don’t have one clear place to point to for a “how to” but you can start at RaspberryPi.org.
Which Digital? Why not D-Star and DMR?
I did a lot of programming of my radios to get the ready with the latest D-Star reflectors, and believe me http://www.dstarinfo.com/ is my go-to site. While that is ready to rock, I thought I might want some DMR along as well. Instead of turning them both on at the same time, I configured 2 SD cards. One will boot up with D-Star configured on the Pi-Star, the other with DMR.
I am hopeful that this will make it easy to switch on the fly at the next stop I make without too many hassles.
And a Big Battery
While I was wandering around the half-empty shelves of my local Fry’s Electronics I found a nice deal on a 20K mAh battery. I also dug in to Amazon to find a 5V to 12V upconverter for the Netgear device.
Big battery!
The two devices combined draw less than 1 amp, so I’ve had this running for >12 hours with battery to spare. I intentionally did not mount the battery on the board to make it hot -ish- swap-able if needed.
I don’t expect to polish much more on this before I depart in 10 days but always open to suggestions on changes. Connect with me at the links via the site.
In the next few weeks I have planned a 5,000 mile road trip across the American South and West and I decided that I wanted a tool that would allow me to hop on DStar from wherever I am, since my car has an ICOM ID-5100 already in it. In general, that is easy because there are several DV Dongle and the like out there. In addition, since I will be driving long stretches by myself I thought it would be great for my friends to be able to click a link and check my location. That’s where the APRS Tracker comes in. This blog post documents the custom, single Pi solution I’ve built by merging Pi-Star and Direwolf onto one Raspberry Pi 3B.
Base Hardware and Software
Pi-Star Zum Radio Hotspot I have owned a Zum-Spot for about a year and I am familiar with the configuration so I picked this as the base of my build. It will allow me to do D-STAR and if I wanted to take a DMR radio, it would give me that option too (and a couple of others). So I picked up a new one with a cute little OLED screen and had it running pretty quickly on it’s own. It comes with the Pi-Zero and SD card, making it fairly plug and play. In the US you can get these at Ham Radio Outlet for about $130.
Direwolf Rasperry Pi APRS Tracker with USB GPS Receiver. I’ve been glad to have an IGate at my home running Direwolf for years, so I am very familiar on the general setup and excellent documentation that WB2OSZ puts together. The tracker was new to me though, and it was pretty straight forward to set up with the specific instructions provided.
Running Both on Separate Pi’s
As I mentioned, the ZumSpot / Pi-Star / Pi Zero unit was easy to get online and easy to pair with my phone to make it mobile. Connected to DMR and made several QSO’s in addition to pretty consistent testing on Parrot.
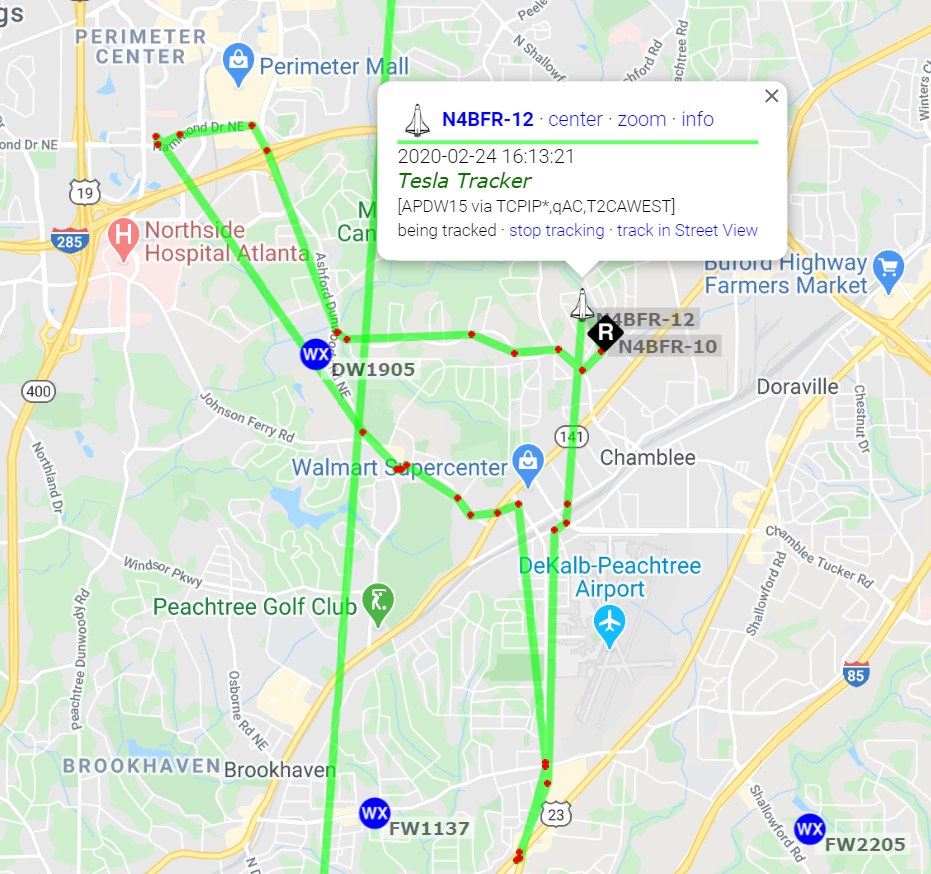
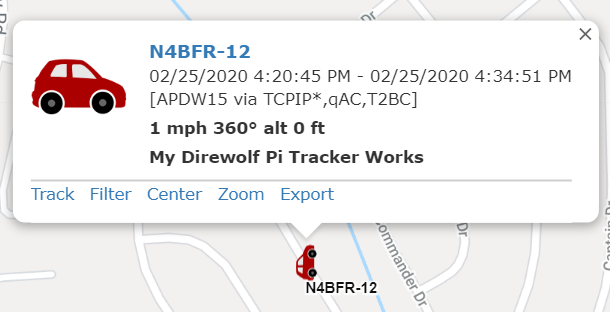
Similarly, I had a Pi Zero W on hand and picked up a $19 GPS puck on Amazon. Ran this in the car for a few days, with the puck just sitting on the passenger seat of the car and it seemed to track me very well. When paired to my phone’s hotspot it simply sent tracking points into the APRS network as I drove around doing errands. The Smart Beaconing feature worked well too. Sample Below.
Level of complexity = clunky.
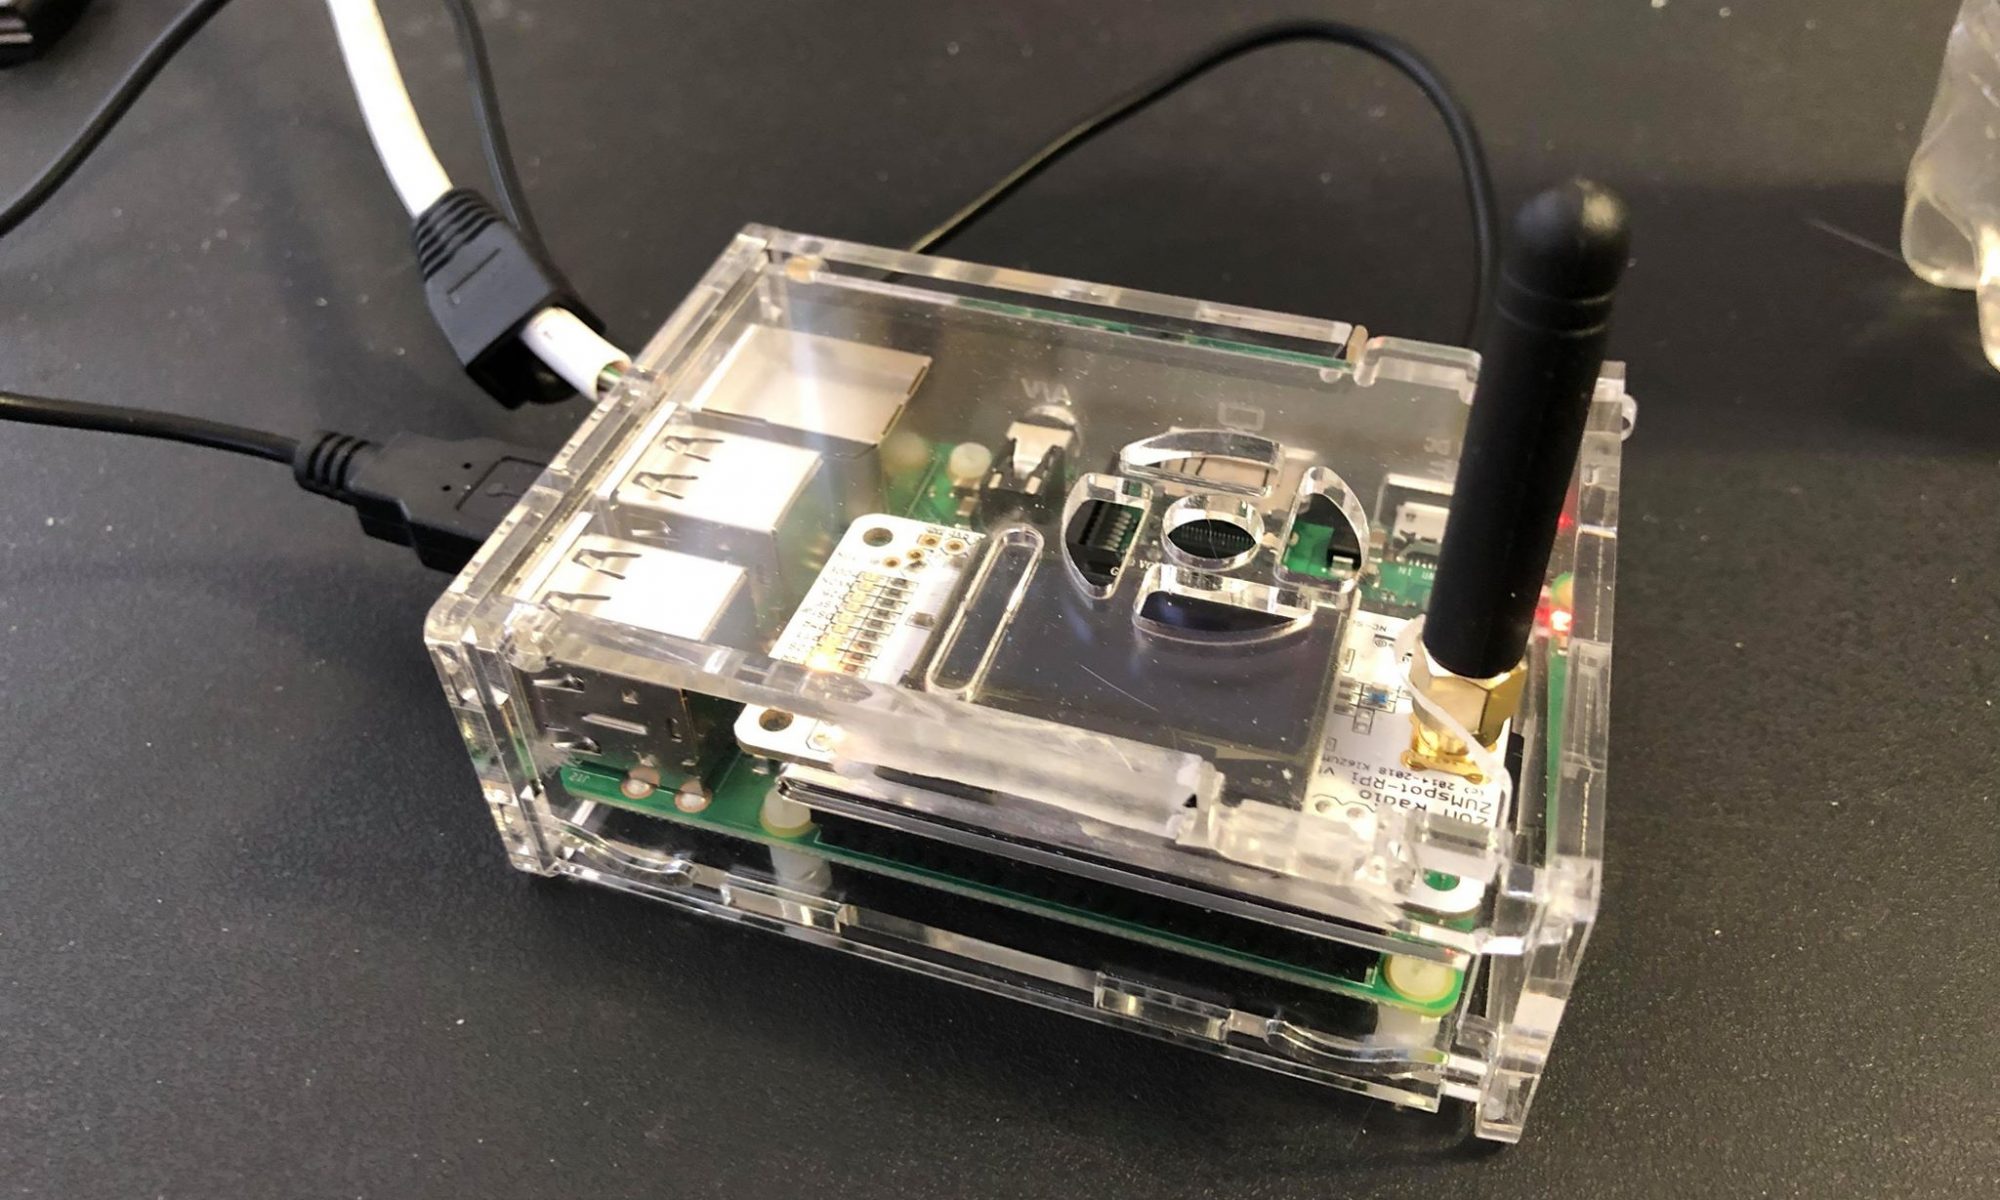
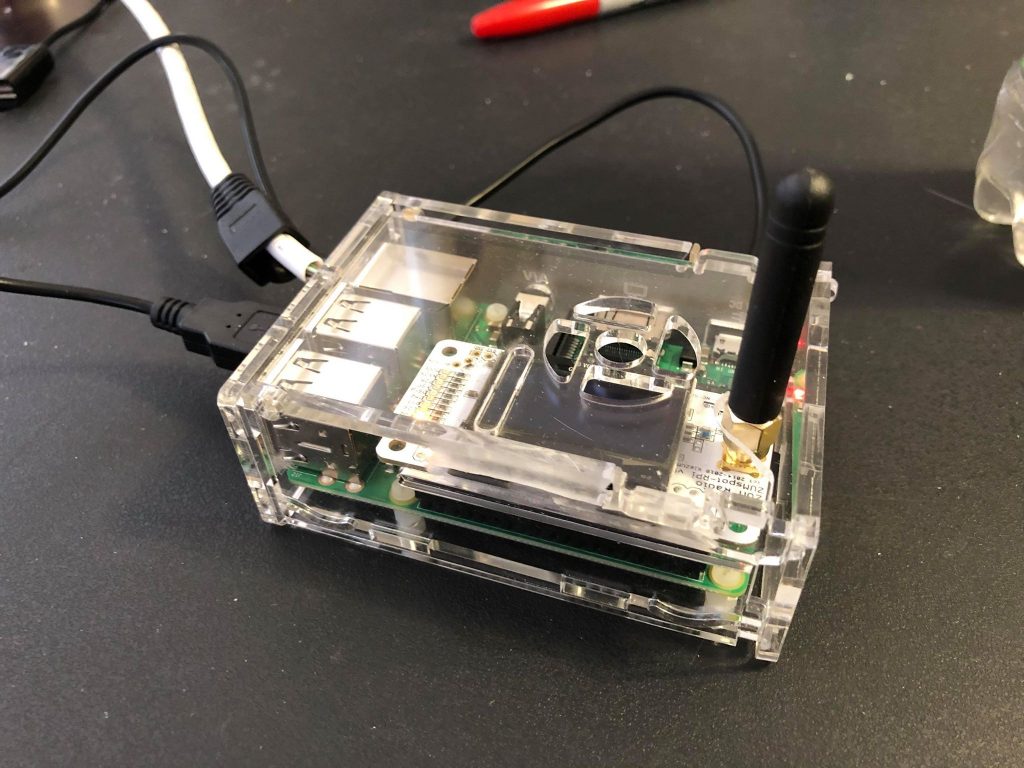
For hardware, the decisions were easy. I chose a Pi3B+ because I had one on hand, I wanted extra power and additional USB ports that the Zero didn’t offer. The ZumSpot moved over from the Zero and on to the GPIO slot and the USB dongle was easy to connect up. The case required 2 little mods for the antenna and the ZumSpot, I cover that in the video at the end.
The Franken-Pi Hardware.
The software side of the build is where the real complexity comes in and frankly, it felt clunky overall. I needed to start with one of the two options, Pi-Star or Direwolf as the base, and add the other. I chose the Pi-Star build as the base, not because I thought it was the best option, but I didn’t see an easy way to add that to the Direwolf software. The level of difficulty is high here, because the builds of Pi-Star software for Raspberry Pi (I used Pi-Star Dev Build 4.1.0 as my base) are very very scaled down and a lot of the “basic” pi functionality is removed. I get it, bandwidth costs money and why include something you don’t need, but it made the build more challenging. So while I was able to quickly set up Direwolf on a basic Buster build, the activity of restoring and de-customizing the Pi-Star build to add modules like GPSD required most of the additional work, which I will noted below.
Starting the install process – Hardware and Base Build
Move the ZumSpot from a Pi Zero to a Pi-3B+. I had the spare and I wanted the extra USB ports for the project.
Download the latest beta version from the Pi-Star website: https://www.pistar.uk/downloads/ I used the January 20, 2020 Beta which is based on the Buster version of Raspberry Pi software.
Do the voodoo you need to do to put the .img file on a MicroSD card. Plenty of tutorials online for that so I won’t go into it.
Boot the card to the Pi and discover the IP address. I am a command line guy, so I SSH’d into the Pi and did the following:
Change from the default password of “raspberry” by using the passwd command
Add IPv6 to the Pi-Star: open /etc/modules for editing: sudo nano /etc/modules and add ipv6 to the end. But I don’t use IPv6 you say. It’s a dependency for using the GPSD module that get’s installed in the next few steps.
Reboot
Next – Install the Direwolf tracker software
I used the Direwolf Git Hub Docs, specifically the Raspberry Pi APRS Tracker document to guide me.
Step 1: Get the system code for GPS installed.
sudo apt-get install gpsd If you get any errors, go back and make sure you did the IPv6 step above.
sudo apt-get install gpsd-clients python-gps
sudo apt-get install libgps-dev
Step 2: Setting up the GPS software I love the little GPS dongles from Adafruit and others and I regularly used them on Stratum 1 Clocks that I build, but I chose a USB version for two reasons. 1) Hard to get at the GPIO pins with the Zum Spot Hat using it, and 2) I wanted something a little more hardened for the car. So, assuming you go my way:
cat /dev/ttyACM0 will show you if the GPS is sending data into the system
Reboot
cgps -s should show you the position data from your GPS. Don’t worry if this takes 15-20 minutes the first time. It needs to download some software from the satellites first.
The Direwolf documentation says to do some testing with the GPSD daemon here. I didn’t find the need to do that. Your mileage may vary.
Here’s another one of those changes you need to make because of the way Pi-Star is setup. Part of the disk is mounted as read only, so if you try to make changes to the GPSD config file without this step, you get errors. sudo mount -o remount,rw /
Now, edit the GPSD config file so it has at least this info (some may already exist) sudo nano /etc/default/gpsd
Exit and then type sudo systemctl restart gpsd to update the system with the changed config.
While we have the system set to Read/Write, we need to re-enable the on-board sound card which is disabled in the Pi-Star Beta build. Enter sudo nano /boot/config.txt. Scroll down to the section # Enable audio and un-comment the line dtparam=audio=on by removing the #. It should look like this when you are done. Exit and save the file and reboot.
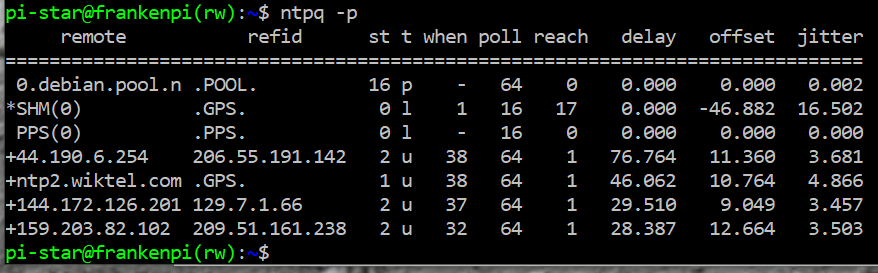
Step 3: (Optional!) Getting GPS time I like having the onboard NTP process being fed from the GPS since the satellites have super accurate time. This configuration is similar to the lines from from the Direwolf Documentation, but I have found that the SatSignal.eu recommendations for ntp.conf have served me well. My GPS device does not feed PPS signals, but I left it in should someone need it.
Edit ntp.conf with sudo nano /etc/ntp.conf Add the following lines near the list of servers
server 127.127.22.0 minpoll 4 maxpoll 4 fudge 127.127.22.0 refid PPS
Let’s tell the NTP server to restart and pick up the new config file: sudo /etc/init.d/ntp restart
Now, give it a minute or so and check ntpq -p and you will see something like this:
I stopped and made a backup of my MicroSD card here. Not a required step, but if I break something in the next few steps, I don’t want to go all the way back to start.
Step 4: Now we actually get to install Direwolf! So the Raspberry PI APRS Tracker instructions we have been following for Direwolf assume you already have the core software installed. We don’t. So let’s hop over to the Direwolf Doc files again and chose the Raspberry Pi APRS instructions. Or just enter the code below if you trust me and don’t need the docs.
We’re picking up in that document at Step 2 in the docs because we’ve completed some of the pre-work. (August 2017 version, page 11) Let’s get some more dependencies! sudo apt-get install libasound2-dev libudev-dev
Finally we get to download the actual program! cd ~ (this puts you back in your home directory) git clone https://www.github.com/wb2osz/direwolf cd direwolf
OK, we’re done with those instructions and back to step 5 of the Tracker document. Let’s build the software:
make clean
make This will take a few minutes. Make sure it ends clean. If you see an error for GPSD go back!
sudo make install You don’t need to run make install-conf when this is done as the prompt says, we’ll take care of that next. If you did, don’t worry, it doesn’t hurt anything.
All of the customization for Direwolf comes in the config file, so we’ll make one. Major credit to WB2OSZ for his extremely well documented configs. They have always made things super easy for me. However, there are many many items we don’t need for this, so I reduced it to the basics. cd .. nano direwolf.conf (you don’t need sudo in your home directory) and enter the code below.
So let’s breakdown what all that means because you will need to make some changes for your situation
#N4BFR Modified - Minimal Config File This is a comment since it starts with #
ADEVICE and ACHANNELS This is a placebo command that points to a fake audio device, it goes back to the fact that Direwolf has its roots as a digipeater. If you were going to also send packets to RF this would be important, but not in this application. So don’t change this.
MYCALL UR1CALL-## This is where you tell the APRS system the call sign or name of your tracker and SSID. Replace UR1CALL with the ham radio call sign you will use and -## with your SSID. Info on choosing an SSID number is here.
GPSD this tells Direwolf to get position data from GPSD
TBEACON EVERY=4 symbol="car" comment="My Tracker" SENDTO=IG This is a key line. TBEACON tells Direwolf to use it’s tracker functionality to send a beacon containing the GPS Location. EVERY=4 sets the interval to beacon in minutes. The symbol=”car” sets your icon on the APRS maps. The comment field can say what you want. Then SENDTO=IG tells it to send the packet to the Internet Gateway (IG). There are other options for this packet, but these are the ones I chose. Check the Direwolf documentation around TBEACON and PBEACON for more info.
SMARTBEACONING ... this is how you can adjust the frequency of how often a beacon is sent to the gateway.
MODEM 1200 is another legacy code.
IGSERVER... The server set is the one for North America. Set yours locally.
IGLOGIN... you need one. Find out more on the Internet.
IGTXLIMIT... sets the top end of 6 beacons in 10 minutes so you don’t hog the gateway.
When you get it the way you want it, close and save.
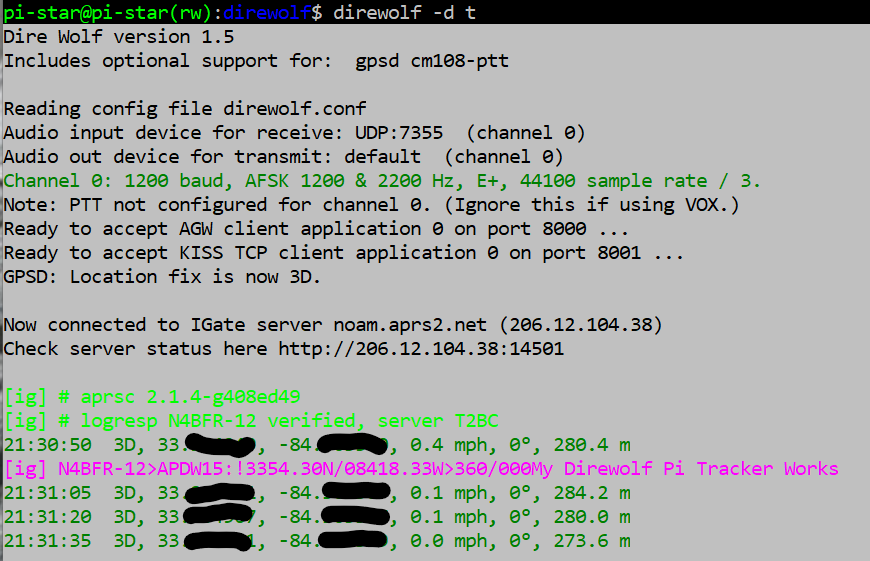
Step 5 – Testing Direwolf You should still be in the Direwolf directory but if not type cd~/direwolf to get there. We’re ready to test with this command direwolf -d t This will start the tracker with position debugging information. If successful, it will look something like this on your pi screen (location obscured).
Pat yourself on the back. Then, shut down the Pi and make a backup. Call your elmer and tell him the good news while you wait for the backup to finish.
Now, what about that Pi-Star thing?
The good news is that with all the functionality I needed to add back in to the Pi so Direwolf could run didn’t seem to clobber anything important for the Pi-Star side. Let’s go through the default set-up method for Pi-Star just to be sure.
Open a web browser and go to the Pi-Star home page. (For me it was http://10.0.1.xx, your network may vary). Because I am using a Pi3 with Ethernet, I just use the same address I was using to SSH into the device. The Base Pi-Star build also sets up it’s own Wifi hotspot. Check the Pi-Star site for more info if needed.
When I opened up the page for the first time it kicked-off a configuration script and then sent me to the configuration page. When prompted for a password it wanted the default password (raspberry), not the one we changed to earlier. You can reset it at the bottom of the Configuration page.
I won’t detail all the Pi-Star configuration steps because there are so many. I will throw in a couple of recommendations:
What frequency to use? I have picked from the list of Simplex Cross-band frequencies on the Southeastern Repeater Association (list). The big thing here is to avoid interference with repeaters or satellite activity.
Change your host name from the default. Tech people I trust have told me there’s a risk here, so why not change it.
DMR: Most of my friends in the Atlanta area find DMR Master 3002 to function well if you are choosing one in the Southeast US
You will go through a couple of rounds of configuration as you progress through the web tool and it pulls in things like an updated list of ZumSpot style modems.
I used the tool to reset the password for the admin page to the same one I was using for SSH for consistency.
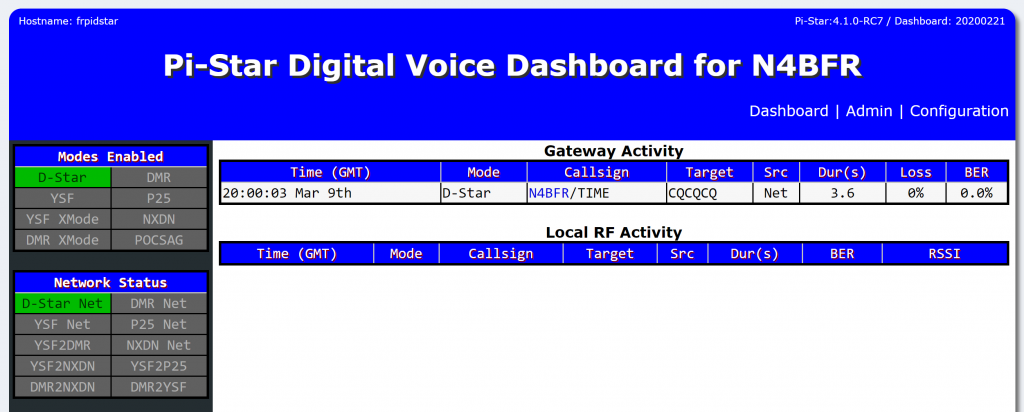
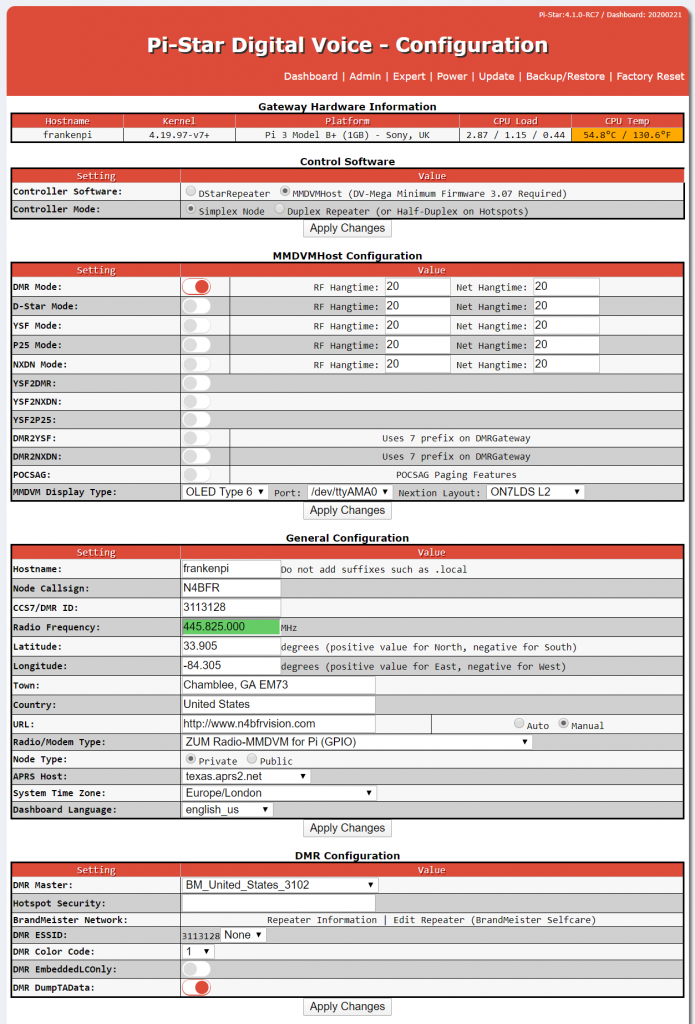
The setup seemed to go normally. Here’s a view of part of my configuration page.
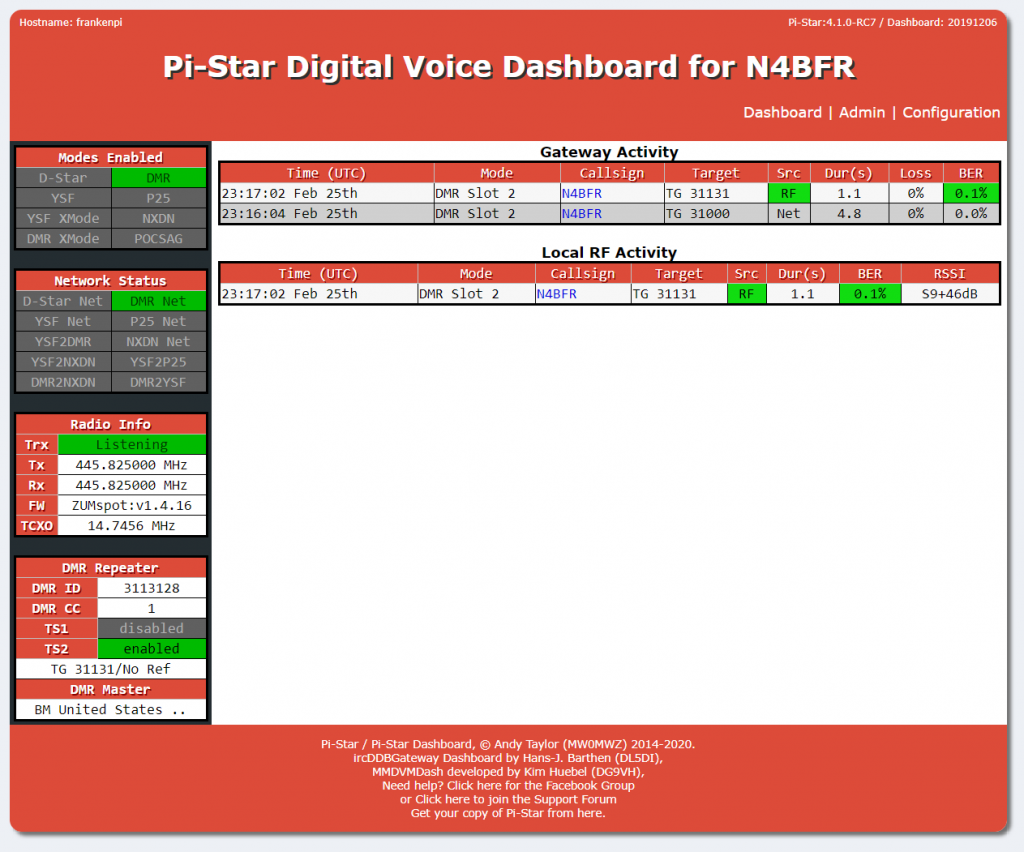
And here’ a view of the dashboard:
One last set-up item, Start the Tracker on Boot
In section 6 of the current Direwolf Documentation for the Raspberry Pi, (Currently Raspberry-Pi-APRS.pdf) there are instructions on how to enable automatic startup. WB2OSZ includes a nice script, dw-start.sh that can be modified to handle this. Here’s how I do it.
While in the direwolf directory, we’ll copy the stock start-up script to the mail home directory (/home/pi-star) with the command cp dw-start.sh ~/ This will keep a copy of the original file in case you want it in the future.
Change back into your home directory with cd ~ and then open the file for editing with nano dw-start.sh. Here’s are the changes I made:
RUNMODE=CLI This was auto, but since I know I will only be using this as a client, I set this to be the default.
DIREWOLF="direwolf" I didn’t need to change this.
Start up command: I chose #1 because we are not running with an SDR attached, so DWCMD="$DIREWOLF" Because we’re not really running an audio channel, I didn’t see the need to print audio stats so I removed that option.
You shouldn’t need to change anything below this. Save the file and close the editor.
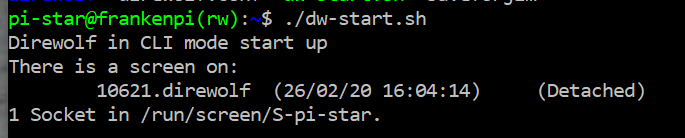
Test it out with the command ./dw-start.sh. You should see this after about 30 seconds:
Your Direwolf APRS Tracker is now running in the background. To see the program in action use the command: screen -D -r "direwolf"
You can watch this as long as you like, but if you would like to return it to running in the background type Ctrl-a and then the letter “d” to put it back in the background. I found more on the Screen command on the RasPi.TV site.
Last step before the finish line. We have a script, it works and not only will it start the Tracker, it will monitor it and restart it as needed. All we need to do is tell the Pi to run the script. I am using the the crontab program that handles scheduling for things like this on the Pi. In your home directory type crontab -e. If this is the first time you have run crontab on this machine you will be prompted to choose an editor. I use nano, but use what you like.
Scroll down to a blank line and type this: * * * * * /home/pi-star/dw-start.sh >/dev/null 2>&1 This will run once per minute to check that your Tracker is running. If it isn’t the script will restart it. If you’re following along with the instructions on the Direwolf site note the path you want to use in this case is /home/pi-star/ vs /home/pi/ because of the way pi-star is setup. When successful it should say crontab: installing new crontab with no other messages.
Congratulations!
You are finished! Before you go set this up in the truck or wherever else you might want to put it, shutdown your Pi and make a backup of the SD card. Now if you want to experiment more, you can always roll back to a good working version.
I’m not going to get into how to connect it in your mobile unit since there are too many variables. I am currently powering it with an Anker power bank and using my phone’s Wifi hotspot. If you want a look at the finished product, watch my YouTube video below.
From my N4BFR Vision YouTube Channel
Expected Questions
I’m avoiding calling this “Frequently Asked Questions” but it could become that later. Some things I thought of that you may be wondering about.
Q: Are you going to publish an IMG file? A: I don’t plan to. I am making this for a specific use, and I don’t expect to have time to track updates against multiple authors in the future.
Q: You said you were going to use this for D-Star but it’s configured for DMR in your sample, is that right? A: Yes, this was just a quicker way to check configuration because I have a known-good Pi-Star with DMR already set up.
Q: Should I run “Update” on this? A: I made sure I started with the most recent beta of PiStar and the latest version of Direwolf. I did run sudo apt-get update prior to any installation, and I ran the update function in the Pi-Star dashboard without issue. Backup first and see what happens, but I generally recommend keeping things updated regularly.
Q: Would this work on a different Pi? (Zero, 4, etc) A: Probably. Give it a try!
Q: Can I modify this by doing….? A: Go crazy! This is just one idea. I hope it inspires someone. The CPU load is very low, less than 2% even when on DMR, so there are resources available.
Q: How big of a SD card did you use? A: 16 GB. I prefer 8 GB but they are harder to come by and right now 16 seems to be the sweet spot of price and availability.
Q: Can you integrate administration into the Pi-Star Expert Configuration section? A: I was able to use the SSH tool to make basic changes to the config file and kick off the program during my testing. I’m not planning on any other integration at this time.
Q: How do I contact you because I have a problem with… A: I can’t give any support for this, but there are great tools like Google and Bing that you can put the error into and probably figure out an answer.
Q: How can I email you and share a success story or a fun anecdote? A: Best way to reach me is use my call sign @arrl.net or one of the links at the bottom of the page.