Following up on my How Long for Long Pi posts from Thursday and Friday I wanted to start quantifying the data a little more. I was able to gather data from 5 Intel computers. They are:
CPU Type
CPU Generation
Form Factor
Intel i7
12th Generation
Homebuilt Desktop
Intel i7
10th Generation
Legion Laptop
Intel i7
8th Generation
Yoga Laptop
Intel i7
7th Generation
Asus ROG Desktop
Intel i7
7th Generation
Yoga Laptop
My testing methodology was to run 3 passes of the test calculating Pi to 100,000 places via a Python 3 script (see Friday’s post) and then to 1,000,000 places. All 5 machines ran native Windows. (The Legion Laptop and 7th Gen Yoga are Win 10, the others Windows 11). On 4 of those machines I could dual boot into Ubuntu 20 Linux from a USB SSD drive.
I was surprised that the Ubuntu versions averaged 13.7% faster calculation time than the Windows machines. I don’t have the details to drill down further to attribute that to the overhead of the operating system or to efficiency of the versions of Python 3.10 or just something else entirely.
When you spend more time calculating, you find an even bigger difference in times. Ubuntu calculations were 28.3% faster at this length of calculation. The other thing that jumped out at me in both calculations was that a 7th Gen Desktop was faster than an 8th Gen Laptop (4.3% on Ubuntu 1 Million) While all these processors are multi-core, it appeared to me that all these were running in a single processor while calculating, using Task Manager on Windows and htop on Ubuntu.
Testing of all 5 versions of Raspberry Pi (0W, 1, 2, 3, 4) are underway. I’ve also got some other devices to test, and I was surprised to see a handheld device outperform one of the 7th Gen Intel machines at a Million places.
Again, please feel free to provide comments on my Twitter – @N4BFR.
In a previous blog post I considered how I might benchmark performance of different computers to understand how they compare across processor generations and maybe in the future across major architectures.
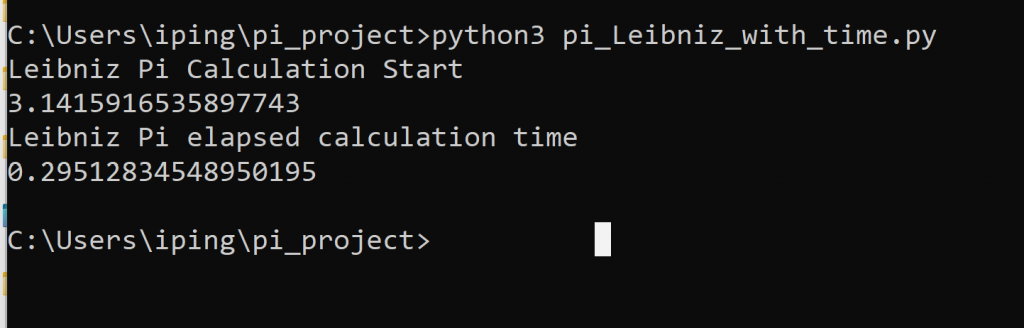
After experimenting with some different Python code, I found a version that is very consistent in it’s performance, seems to run on 1 core of a multi-core processor and can run on Windows and Linux. Here’s the version I am using for calculating Pi to 100K. I sourced it from this Stack Overflow thread.
#-*- coding: utf-8 -*-

# Author:    Fatih Mert Doğancan
# Date:      02.12.2014

# Timer Integration 18-Jun-22 by Jim Reed

# Timer function Start
import time

start = time.time()
print("Dogancan - Machin 100,000 Digits Pi Calculation Start")

#Original Calculation Code goes here


def arccot(x, u):
    sum = ussu = u // x
    n = 3
    sign = -1
    while 1:
        ussu = ussu // (x*x)
        term = ussu // n
        if not term:
            break
        sum += sign * term
        sign = -sign
        n += 2
    return sum

def pi(basamak):
    u = 10**(basamak+10)
    pi = 4 * (4*arccot(5,u) - arccot(239,u))
    return pi // 10**10

if __name__ == "__main__":
    print (pi(100000)) # 100000


# calculation code code ends
# timer reports

end = time.time()
print("Dogancan - Machin 100,000 digits elapsed calculation time")
print(end-start)
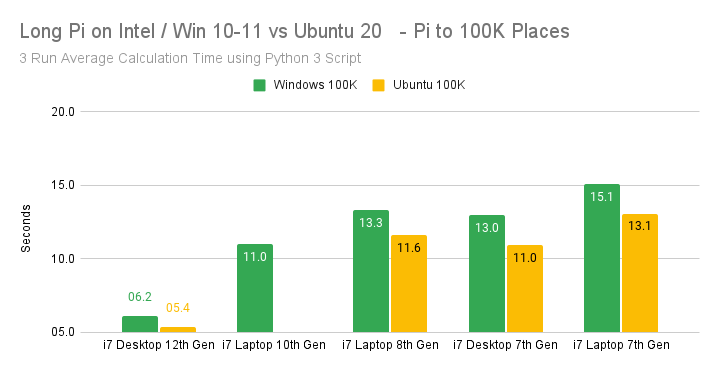
I expect to share all my raw data as I get it more in shape, but I am definitely getting some good first impressions. Let’s look at a summary of the tests on 5 machines so far, running Pi to 100K places using the code above on Python in a command prompt / terminal shell.
My PC Name
PC Type
OS
Pi to 100K in X Seconds (Avg 3 Runs)
Telstar
Raspberry Pi 3
Raspbian
148.395
Edison
Raspberry Pi 4 8GB
Raspbian
111.263
Tesla
Intel i7-7th Gen Desktop
Win 11
12.997
Tesla
Intel i7-7th Gen Desktop
Ubuntu 20
10.960
Charlie Duke
Intel i7-8th Gen Laptop
Win 11
13.342
Charlie Duke
Intel i7-8th Gen Laptop
Ubuntu 20
11.627
Marconi
Intel i7-12th Gen Desktop
Win 11
6.152
Marconi
Intel i7-12th Gen Desktop
Ubuntu 20
5.352
No surprise here on machine power. The more powerful the machine, the faster it processed. Now, I don’t think I have enough samples or data to draw a strong conclusion, but on the machines where I could run Ubuntu and Windows, Ubuntu outperformed Windows by at least 12% when averaged across the three runs.
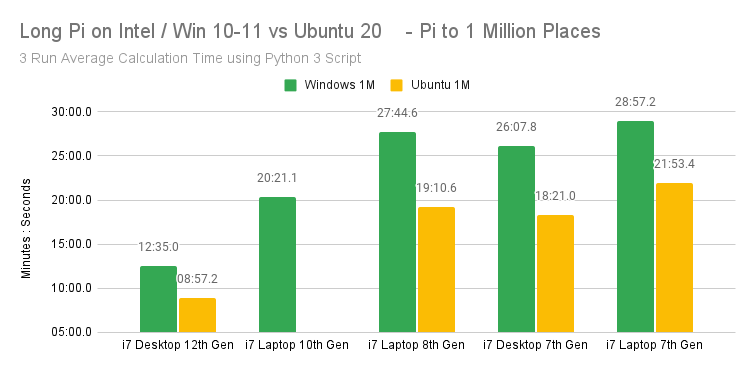
Now let’s step it up an order of magnitude. How long will it take these machines to calculate Pi to 1 Million places. I used the same Python script, just changed the variable. Note on this run because of the long run times, I only ran the Raspberry Pi tests ONCE, the 3 other PC’s show an average of 3x runs.
My PC Name
PC Type
OS
Pi to 1 Million in HH:MM:SS
Telstar
Raspberry Pi 3 (1 Run)
Raspbian
5:12:57
Edison
Raspberry Pi 4 8GB (1 Run)
Raspbian
3:42:01
Tesla
Intel i7-7th Gen Desktop
Win 11
0:26:08
Tesla
Intel i7-7th Gen Desktop
Ubuntu 20
0:18:21
Charlie Duke
Intel i7-8th Gen Laptop
Win 11
0:27:44
Charlie Duke
Intel i7-8th Gen Laptop
Ubuntu 20
0:19:11
Marconi
Intel i7-12th Gen Desktop
Win 11
0:12:25
Marconi
Intel i7-12th Gen Desktop
Ubuntu 20
0:08:57
One of the really cool pieces of data was the difference in the Marconi runs on Ubuntu 20 was 0.14 seconds from high to low.
The difference in the Windows vs Ubuntu really stood out this time. Here’s the 3 machines data individually: Charlie Duke was 30.46% faster with Ubuntu Tesla was 29.78% faster with Ubuntu Marconi was 28.84% faster with Ubuntu
So, ultimately, I don’t know if this will mean anything to anyone but me, however I am enjoying this so far. Next steps:
Complete Household Data Gathering – Will run on Pi 1 and Pi 2, a 10th Gen Intel Laptop and a 2105 Mac Mini
Publish my complete data set.
Understand if I can port this calculation. Ultimately I’d love to try one of the old museum Cray machines to see if I can add those to the scoreboard.
If you have comments or thoughts for me on this, you can tweet me @N4BFR.
Note: This is less of a blog post and more of a running commentary on a project I have conceived. I have a long way to go on it but I hope you enjoy the journey.
I’ve been thinking about computers I have seen at places like The National Museum of Computing in the UK or the Computer Museum of America here in Metro-Atlanta. One of the things that has always challenged me is how to benchmark computers against each other. For instance, we know the Cray 1A at the CMoA had 160 Megaflops of computing power, while a Raspberry Pi 4 has 13,500 Megaflops of computing power according to the University of Maine. What can you do with a megaflop of power however? How does that translate in the real world.
I’m considering a calculation matrix that would use one of two metrics. For older computers, how many places of Pi can they calculate in X amount of time. Say 100 seconds? For newer computers, how long does it take for the machine to calculate Pi to 16 Million places. Here are my early examples:
Pi to 10,000 Places on Raspberry Pi
Computer
Processor
RAM
Elapsed Time
How Calculated
Raspberry Pi Model 3
ARM Something
Something
6 Min 34 Sec 394 Seconds
BC #1 (Raspbian)
Raspberry Pi Model 3
ARM Something
Something
2 Min 15 Sec 135 Seconds
BC #2 (Raspbian)
Raspberry Pi Model 3
ARM Something
0 Min 0.1 Sec
Pi command
Pi to 16,000,000 Places
Computer
Processor
RAM
Pi to 16M Places Time
How Calculated
Lenovo Yoga 920
Intel Core i7-8550U CPU @ 1.8 GHz
16 GB
9 Min 55 Sec 595 Seconds
SuperPi for Windows Version 1.1
Lenovo Yoga 920
Intel Core i7-8550U CPU @ 1.8 GHz
16 GB
0 Min 23 Sec
Pi command
N4BFR Vision Desktop
Intel Core i7-12700K CPU @ 3.6 GHz
32 GB
3 Min 15 Sec 195 Seconds
SuperPi for Windows Version 1.1
Raspberry Pi Model 3B+
ARM 7 Rev 4 (V71)
1 GB
6 Min 03 Sec 363 Seconds
Pi command
Tools I am considering to use will be an issue because I want consistent performance across operating systems. Efficiency will be an issue because I will want something that computes at roughly the same speed for windows as for Unix.
SuperPi for Windows 1.1 was the first I came across and it seemed to be pretty straightforward that would run on many versions of Windows I came across.
Moving on to a calculator I could use in Unix, I found this John Cook Consulting Website that had a couple of calculations using the BC program. I found the results inconsistent on the Lenovo Yoga 920
BC Calculation 1: time bc -l <<< "scale=10000;4*a(1)"

BC Calculation 2: time bc -l <<< "scale=10000;16*a(1/5) - 4*a(1/239)"
I then found the Pi command on pi that might be more consistent with what I need.
$ time pi 10000
Pi Calculations on Lenovo Yoga 920 Windows time is reported by SuperPi. BC time is “Real” time reported by process.
Pi Calculated to X Places. X=
Windows Time
BC `
BC 2
Pi Command
10K (Pi Compairison)
1 Min 45 Sec
0 Min 32 Sec 0 Min 35 Sec
0.09 Sec
20 K
3 Min 22 Sec
0.
50K
Incomplete after 15 minutes
128K
0 Min 01 Sec
Incomplete after 60 Minutes
512K
0 Min 08 Sec
1 M
0 Min 16 Sec
8 M
3 Min 05 Sec
16 M
9 Min 55 Sec
0 Min 23 Sec
So using BC as a method of calculating does not seem to scale.
Coming back to this a few days later, I may have a partial solution. This will limit the use of this on older machines, but should be fairly consistent with newer ones. I plan to do the calculation with a script in Python 3. This should allow for roughly similar performance on the same machine to make results more comperable.
Python3 methods for calculating Pi: https://www.geeksforgeeks.org/calculate-pi-with-python/
I was able to get a rudimentary calculation in Windows using both of the formulas and include a function to time the process consistently. Now I need to compare in Linux and blow out the calculation to allow a material number of places for this to be an effective measure.
I have found a few more options thanks to StackOverflow and I’m testing them now on my 12th Gen Intel machine.
100,000 digits of Pi using the “much faster” method proposed by Alex Harvey: 177.92 seconds for the first pass, 177.83 seconds for the second pass. I like the consistency
Guest007 proposed an implementation using the Decimal library. I attempted a 10,000 digit calculation and that took 24.6 seconds, 100,000 places didn’t complete after more than 10 minutes. Interestingly, a peek at the system processing said it was only running 8.1% of CPU time.
Tomorrow I’ll start a new chart comparing these two methods across multiple machines.
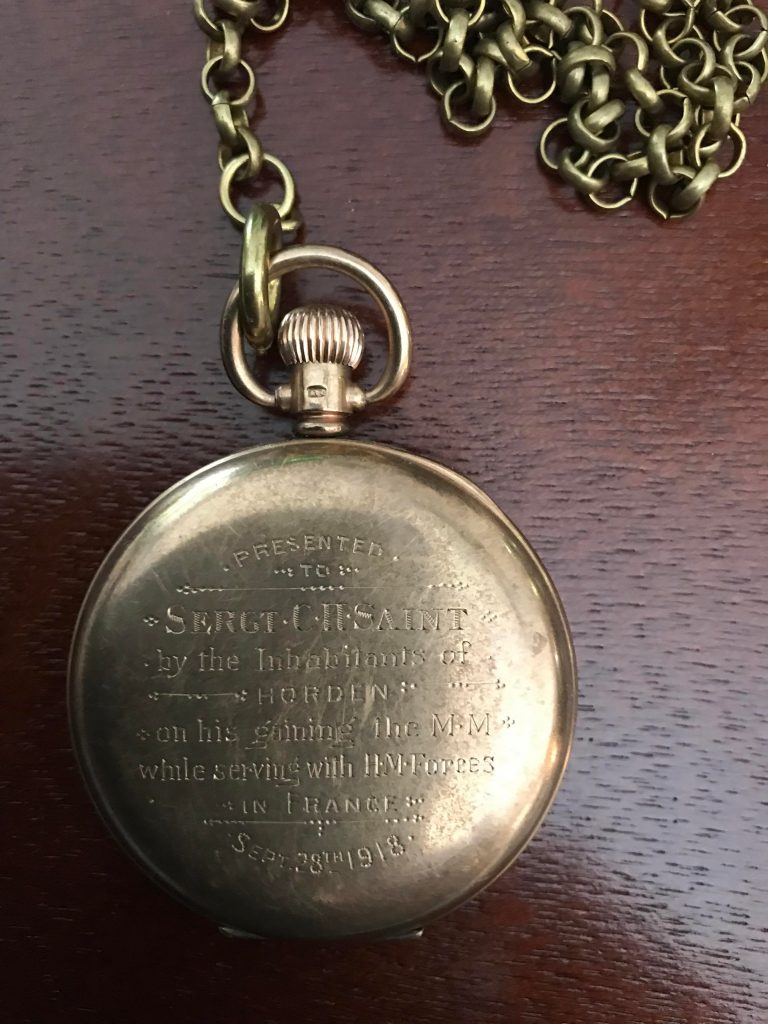
Sgt. C.H. Saint’s gift from the town of Horden for being awarded the Military Medal during WW1.
I’m enjoying looking more and more into my family history and today I am spending a few minutes on C. H. Saint who hailed at one time from the village of Horden, England in County Durham. Great Granddad Saint was given the Military Medal in 1918.
Here’s what Ancestry.com has to say about Sgt. Saint
Born in Marsden Colliery, Durham, England on abt 1890 to John Thomas Richardson and Dora Harrison. Clemett Harrison Saint married Rose A Salmen and had 1 child. He passed away on 21 Mar 1937 in West Hartlepool, Durham, England.
– Ancestry.com
I found this at the UK National Archives site. It appears he fought in Egypt during the war, in the British Army’s Durham Light Infantry.
I’m hoping to visit Hoden in the fall to see what else I might find out.
Note: Initial post of this article was around 5 PM on April 20, 2022. I corrected the post around 6:20 to reflect the proper call sign.
In case you didn’t know, Telstar was the first satellite to do communications between 2 continents. It launched in June 1962 and lasted less than 9 months.
YouTube was nice enough to suggest this Periscope Film called “Behind the Scenes with Telstar.”
This left me with a few questions:
At 27:08 in the video the tech says “sending station identification” and you hear in Morse what appears to be DE KF2XBR.
Correction from initial post: I found a second video where you can hear the Morse Code and it’s clearer now. The call sign is KF2XCK as found in the linked video from AT&T Tech Channel.
I don’t know that satellites to this day that satellites have had their own callsigns, so I’m assuming this is the ground station call sign. That ground station was in Andover, Maine. (An additional Bell Labs Telstar video confirms at least the DE KF portion of the call.)
This raised a couple of questions for me. If it was a communications service, why didn’t it have a XXX#### type call that seems to have been given out at the time?
Why was if KF2*** when Maine is in the 1 call sign area? My guess is that KF2XBR would have been assigned to Bell Labs, and that would have been coordinated out of their New Jersey HQ. I looked at the 1961 and 1963 Call Books, but there are no K*2X* stations listed.
I’ll be doing more research but if I am to believe Wikipedia, all experimental call signs, not just amateur, were in this **#X** format.
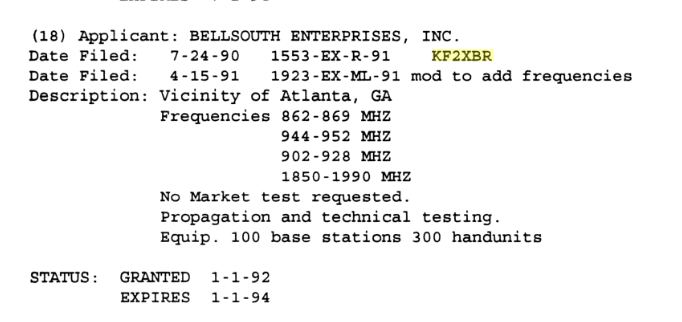
I did find a later use of KF2XBR as part of a BellSouth permit granted by the FCC in 1990. These look like cellular telephone frequencies.
From reading through these FCC proceedings, it might say that these experimental calls were given out sequentially instead of by call region, because many of the calls listed were KF2X** calls.
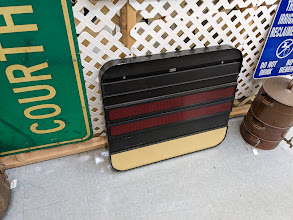
Back in January found an 80’s vintage airline gate sign in an antique store and decided to upcycle it into something that would fit in my tech center redesign.
Poor sign all unwanted.
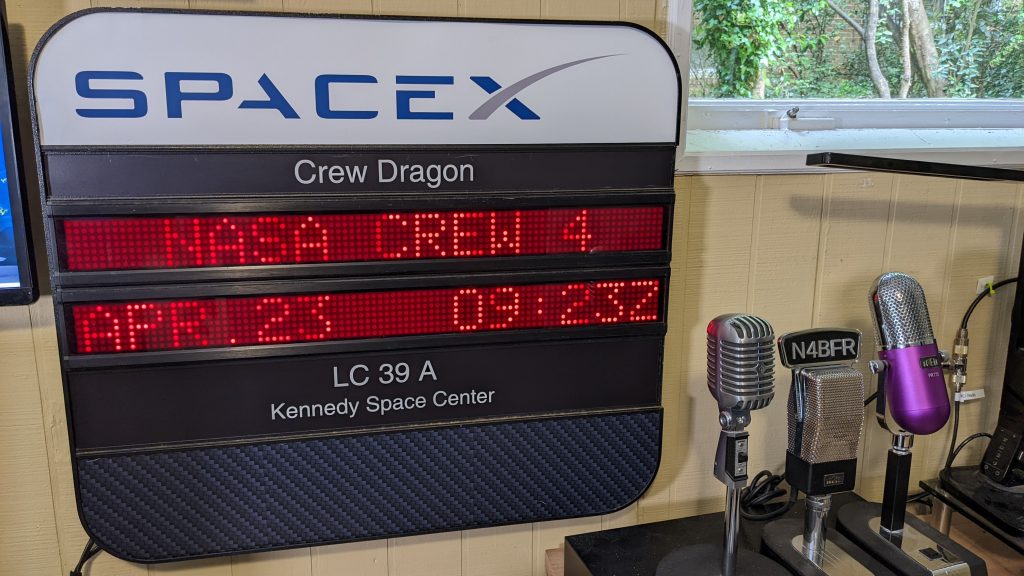
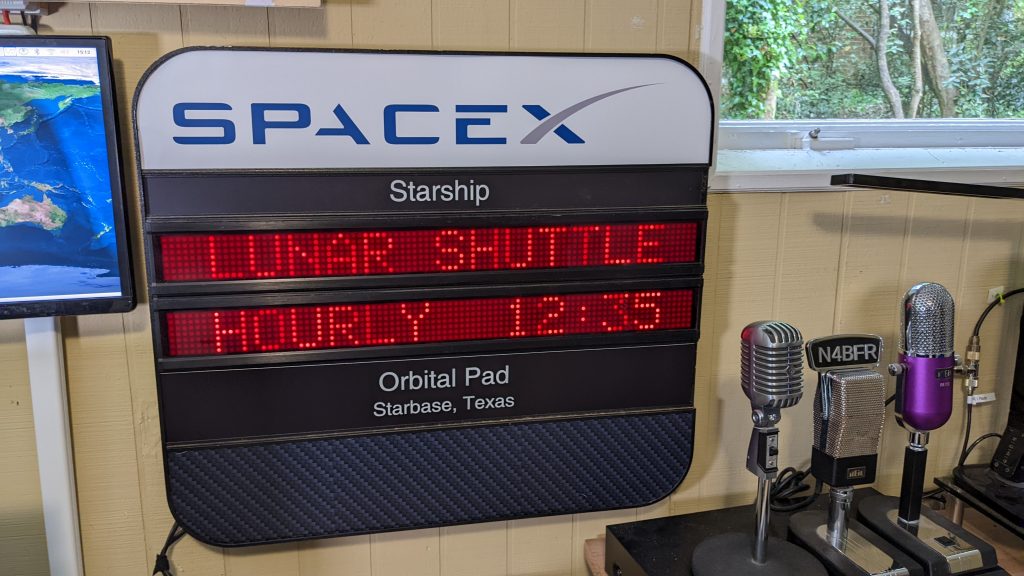
I introduce the SpaceX Gate sign.
The sign was supposedly a Piedmont Airlines sign from Newark. It had no power or instructions but I knew I could get past that. Two power bricks later and the LED’s were working great. I reached out to the manufacturer but no luck on getting a manual. I powered along.
I reached out to AlphaGraphics in Dunwoody where one of my former co-workers had set up shop. They were great in going back and forth with me to get the sign elements just the way I wanted.
There are 4 possible “vehicle” inserts. Crew Dragon, Falcon 9, Falcon Heavy and Starship. There are 4 possible “gate” inserts, 39A at KSC, Pad 40 at CCSFS, Pad 4 at Vandenberg and Starbase, Texas. Here’s an example:
Prepared for the future!
I plan on updating this with the latest manned mission info, which is currently NASA Crew 4 as shown. The LED’s are updated with a slide out keyboard on the right.
You can see this in action and the entire build in a video on my N4BFR Vision You Tube page:
What do you think? Leave feedback on YouTube or tweet me @N4BFR.
I purchased a Xiegu X108G HF Transceiver at the Dalton Hamfest from an estate seller. The radio appeared to be lightly used and in it’s original foam shipping container. I connected it to my LiPo battery and my dipole HF antenna to check reception. This video shows WWV on 10, 15 and 20 Mhz. All three frequencies were coming in to my location nicely on this Sunday morning.
My goal is to build this into a small kit with a battery and end fed antenna that I can keep in my car for when the POTA bug strikes me on road trips.
First impressions:
Sounded fairly good when warmed up. On first power up, I was picking up RFI bleeding in at 15 Mhz from a local broadcaster, whose transmitter is 6 miles away as the crown flies on 680 Mhz. That seemed to fade out as I switched around between the bands. I also toggled the preamp on and off, so I can’t isolate what the culprit is.
The best control of the radio seems to be from the Icom like microphone. I could switch bands, directly enter frequencies and try different modes like AM vs USB. I wasn’t impressed that USB was set to a 2.3 Mhz bandwidth by default, I prefer 2.7 so this was a little narrow.
The power on screen listed firmware from 2017 so I will be looking for options to upgrade that. It did not remember the frequency I was on when I turned it off and on, instead defaulting to 14.270 Mhz and LSB.
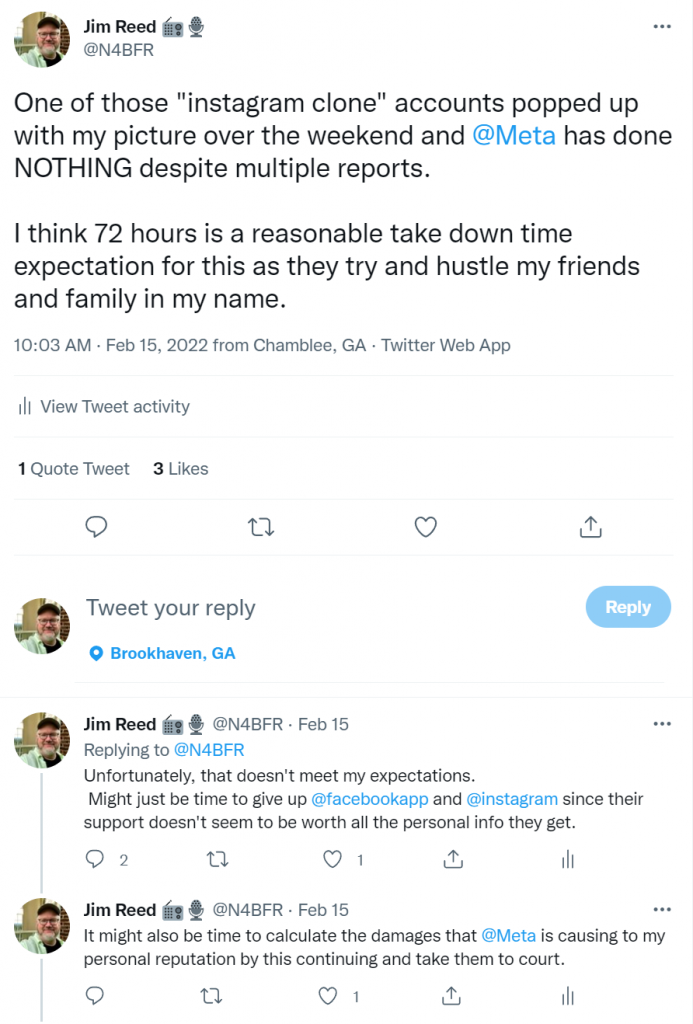
Saturday – February 12 I was enjoying a nice weekend on the beach when on Saturday Evening my cousin sent me this in Facebook Messenger:
That’s real me at the bottom and fake Insta-clone me at the top. She was nice enough to block and report the account that was asking for money. I figured, “hey, we reported this quickly, that should put this fire out quickly.” Ha! Just in case, I added a post of my own:
Monday, February 14 Home now and assuming that the now multiple reports of my clone have encouraged the Meta company to take action. Ha! The clone has not contacted me directly so I can’t find them to check on it. They did seem to pick my wife to hit up:
Now I have a name. Back into Facebook and Instagram to make some reports. I even reach out to the clone myself:
No response. The account remains. I add some background info to my followers.
Tuesday, February 15
It’s been almost 72 hours since the first appearance of the clone and the first report to Meta. The account remains on Instagram. I reported them again. I “escalate” to Twitter:
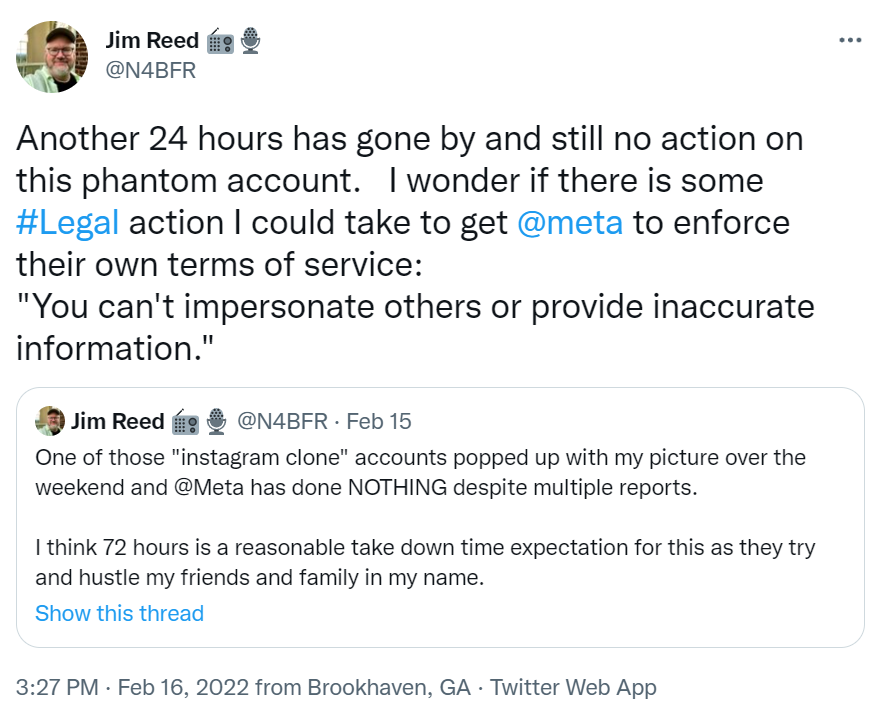
Wednesday, February 16
Escalation does not seem to have driven any action. I can confirm the suspect account has been reported a minimum of 5 times since Saturday. Another appeal on Twitter in addition to my daily reports,’
Thursday, February 17
It’s been 5 days since the fake Instagram clone account has appeared and I have not heard a single response from Meta, Facebook or Instagram. Today I try a new vector to disrupt this user. Since they are using a photograph I took on their profile, I have reported their profile for copyright infringement.
As of 12:05 this afternoon the copyright report is submitted:
and just to prove that I am reporting these daily via their tool:
Thursday, February 17 – 3:20 PM
Apparently Instagram cares WAY MORE about copyright infringement than stolen identities, because the picture I reported was removed in less than 3 hours. This is after FIVE DAYS of reporting the account. I hope this gives someone another tool in their tool kit to fight social media scum.
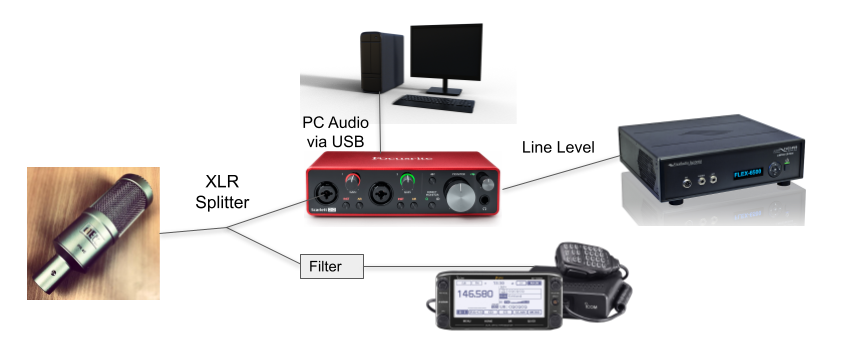
For a long time I have used two mics for my amateur radio setup, a Heil PR-40 for my HF rig and A Heil PR781 for my ID-5100. I received good audio feedback all around and every time I tried to get down to 1 I’d get noise in one or the other rig and I’d just go back to what worked.
Recently I’ve been doing some writing work and that’s required me to have conference calls a couple of times a week. The mic on the camera is decent, but I have these beautiful professional mics right next to me, and it was killing me not to use them.
I ended up purchasing a new tool to help me integrate. The Focusrite Scarlet 2i2.
Now, instead of the PR-40 going straight into the balanced input of the Flex 6500, it runs into the 2i2. The 2i2 has 2 line level outputs on the back. I run that to the Flex 6500 and it doesn’t know the difference. With the Focusrite’s USB connection to the PC, it sees it as a sound card that I can run into Zoom or Google Meet. No sweat.
This still leaves the problem of feeding the ID-5100. I’ve done this for now.
[Image Removed – It was a hot mess.]
I received feedback from the folks on the Atlanta Radio Club Sunday Night Net that the XLR Split leaves my FM audio with a high pitched whine in it. So, as the graphic says, I’m going to build an adapter to come out of the other Scarlett 2i2 line out port and step the audio down to Mic level for the 5100.
Parts are on order. I’ll update later this week on how things go.
17-Feb-21: It’s Later. Here’s what happened.
The device I made didn’t work as planned. I also purchased a commercial device and tried it on the line to the ICOM 5100. It didn’t like that either. So I purchased a mic filter that seems to mitigate some of my audio issues and here’s what the chain looks like.
If you have any thoughts on this, hit me up on Twitter @N4BFR.