Why I embrace the leap second as a symbol of our imperfect earth, and think tech can find another way.

Clock showing EDT and UTC

In the last week or so, the tech industry has announced, “time is hard, we don’t want to manage to it.” Actually what they have done is attack the concept of the leap second which is designed to keep atomic time (known as UTC) in sync with solar time. A leap second is an adjustment of the “civil” time standard, just like a leap day adjusts the calendar. The earth does not perfectly rotate 24 hours every day, so on occasion a leap second will be added. The last adjustment was in 2017. Here’s what it looked and sounded like, just an extra tick at 23:59:59:

I was first alerted to this discussion on This Week in Google #674 and their takeaway seemed to be, “either way it’s not a big deal.” Adding 1 second in the last 5 years, no big deal to the average person and that seems right in may ways. The discussion was triggered by the tech industry’s view outlined in this Facebook Engineering article titled, It’s time to leave the leap second in the past. The article, as I summarize it, says, “look at all the ways the tech industry has screwed up leap seconds, wouldn’t it be better for us if they went away.”

I encourage you to look at the whole article on the Facebook page, but if you didn’t I have highlighted a couple of their issues and supplemented that with a few counter arguments to big tech’s talking points:

“This periodic adjustment mainly benefits scientists and astronomers”
Doesn’t it really help the community at large? What the leap second does is keep Coordinated Universal Time (UTC) in line with solar time. 12 Noon in UTC is astronomical noon, not 11:59:57 or 12:00:03. The second is a standard measurement, 9,192,631,770 vibrations of the cesium 133 atom. As Wikipedia says, “A unit of time is any particular time interval, used as a standard way of measuring or expressing duration. ” Solar midnight to solar midnight has been the standard for the day for millennia, and it makes sense we would adjust that for the earth’s varied rotation in our time measurement.

” …these days UTC is equally bad for both digital applications and scientists, who often choose TAI or UT1 instead.
I don’t know if I agree that they are equally bad for scientists, but let’s focus on a “civil” day being solar midnight to midnight. UTC maintains accuracy to the solar day.
TAI and UT1 are exactly what the tech companies are arguing for, a time standard that does not incorporate leap seconds. The site Time and Date explains it well. TAI is “International Atomic Time” the synchronization of hundreds of atomic clocks. TAI never adds leap seconds, it is based on continuous counting since January 1, 1958. That means it is 37 seconds different than UTC based on 10 leap seconds added in 1972 and 27 leap seconds since. UT1 is a time standard based on the earths rotation which also has a fixed calculation. Just to be complete, there is also GPS time which started at 0 on January 6, 1980 and counts continuously. It is ahead by 18 seconds.

Here’s a table that shows the differences at Midnight UTC in London

Time StandardTime Indicated at 0:00 UTC
Coordinated Universal Time
(UTC)
00:00:00
(12 Midnight)
GPS Time00:00:18
(12:00:18 AM)
International Atomic Time
(TAI)
00:00:37
(12:00:37 AM)
Solar Time
(UT1 as of 30-Apr-22)
23:59:59.9025
(11:59:59.9025 PM)

Why is this important to the tech industry?
Every time you post on Twitter, make a stock trade or send an email it is time stamped. Every time stamp tells Facebook which post is the newest or the energy plant when to start the generators for the next wave of power distribution. Accurate time IS important, by no doubt.

Does this need a change to leap seconds?
I say no, and here’s why.

1) This is a software problem. It CAN be fixed in code. Having an entire new second show up every 18 months or more can be a hassle, and a random one at that since it’s inconsistent. Google and Amazon already have a solution called the Leap Smear. Instead of adding 1 second at 23:59:59 UTC on June 30 or December 31, they take the whole day to add the second in very small increments of 11.6 PPM. So their time is off of UTC time by no more than the accumulation of this smear across a half day, never more than +/- 0.5 seconds. While doing that, it keeps the standard of Solar Midnight being UTC midnight.

2) The tech giants can use the other time scales. If they desire to have a time standard that always goes forward, never back, and never smeared, they can use the existing TAI or GPS time. There is not a conglomeration of networking for this standard like there is with NTP, but there could be. Major multi-billion revenue tech companies like Google, Amazon, and Facebook absolutely can afford the time and resources to make this their standard.

Let’s look at GPS time as the option. The standard is already in place, floating above our heads and many many places use that tech for time coordination today. I even use it in my own home.

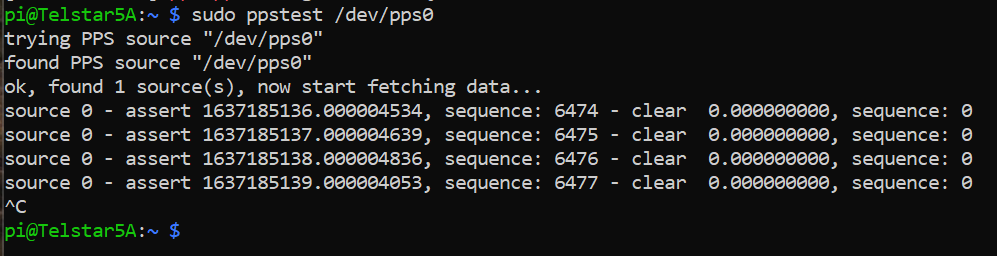
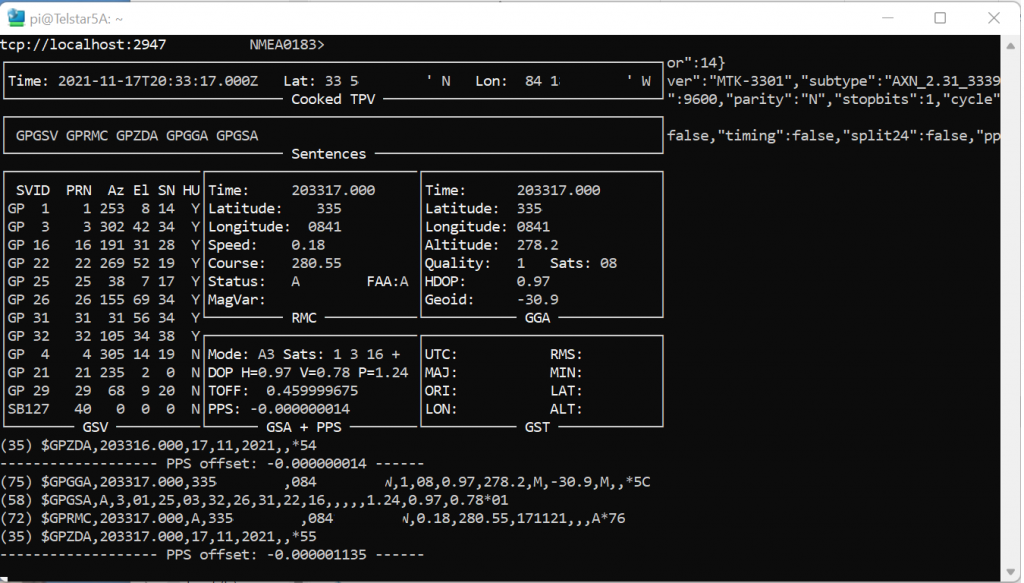
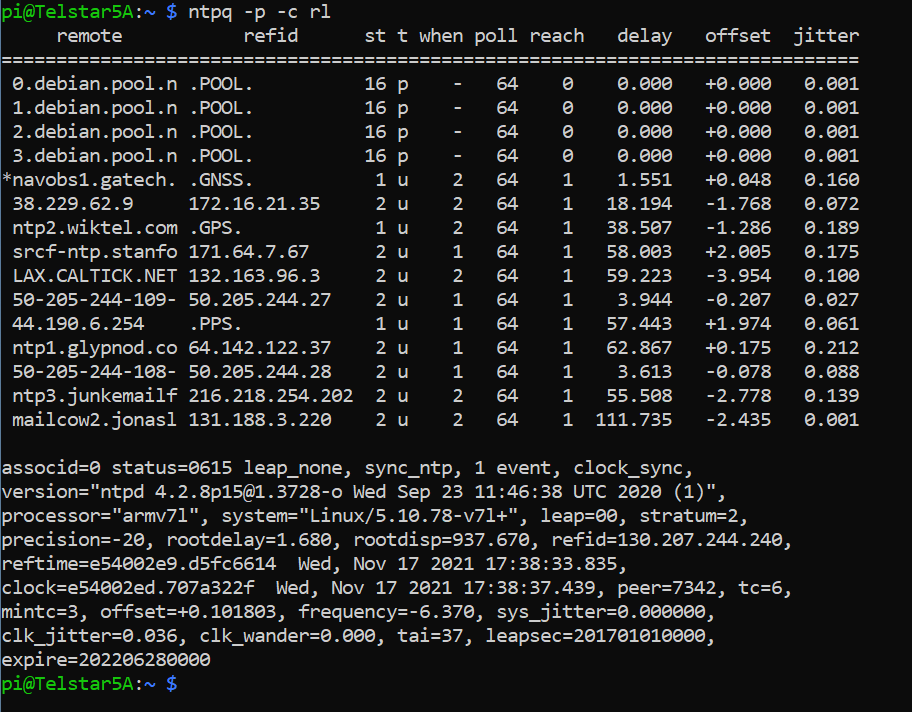
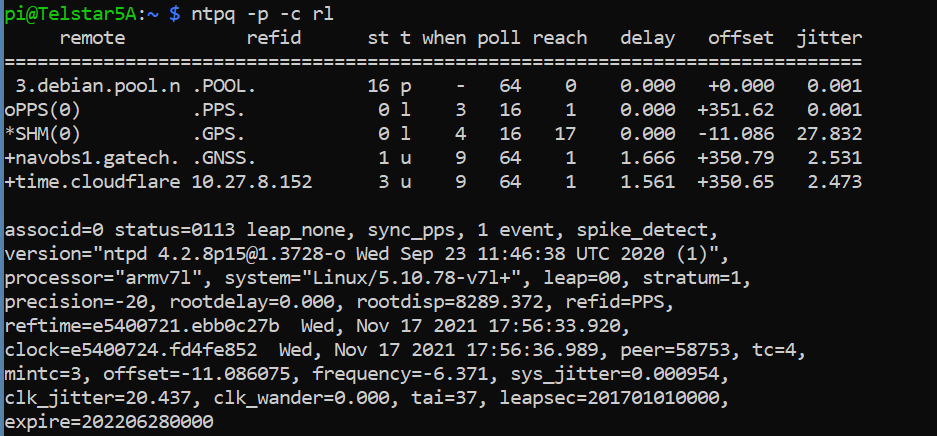
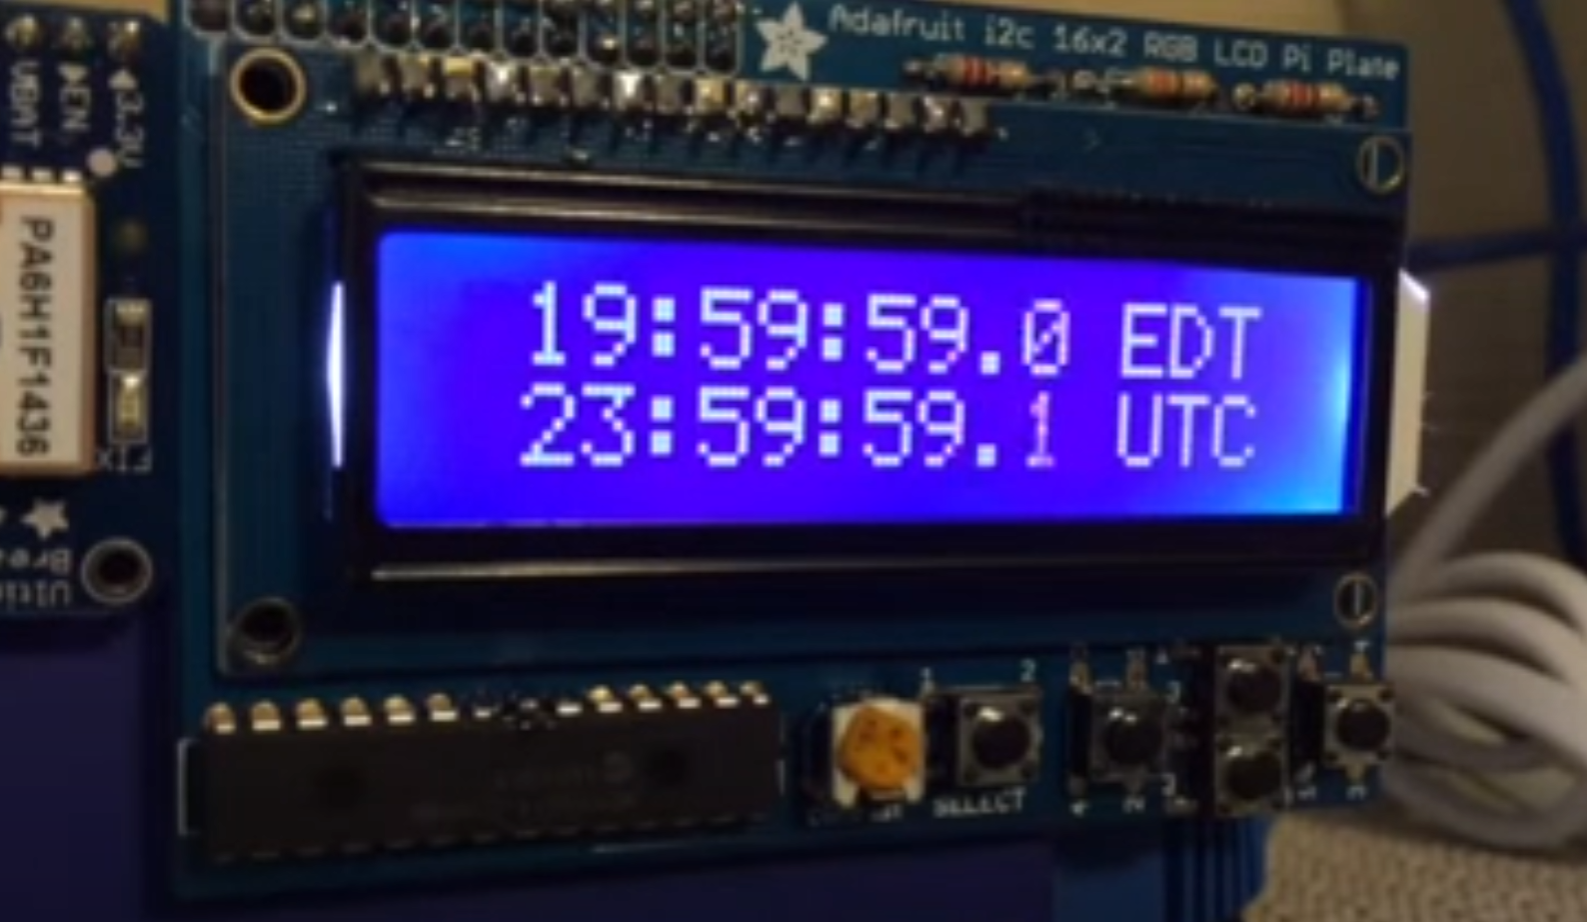
Here’s a screen shot of my NTP server that uses GPS for time synchronization. The time data here is a super accurate standard that costs me less than $100 to add. This clock is accurate to 2^-20 seconds (see precision=-20 above) which equates to about 1/1,000,000 of a second. One-Millionth-of-a-second accuracy, in place today. Basing “server time” or whatever you want to call it on GPS time would probably be trivial because, again, it’s a software change. Do you really know or care if your Instagram post says it was posted at 1:34:18 instead of 1:34:00? Unlikely.

We already have a “leap” standard.
Just like the earth doesn’t quite revolve in exactly 24 hours around it’s axis, it’s doesn’t revolve around the sun every 365 days. It’s more like 365.24 days to make a year. We have a way to handle changes to Earth’s imperfect rotation and it’s called a leap day on a leap year. Just ask all those February 29th babies who should be 40 but claim to be 10.

After all the analysis, here’s my recap.
It’s wonderful that technology is in a place where we can measure time by counting the vibrations of an atom. Our Earth is not actually that precise though, so that imperfection trickles down to our days and years. Our time and date standards are well thought-out to align to the solar changes in both. We should maintain UTC against the solar “civil” day, not the arbitrary day that counts against a cesium atom.

Instead of the tech companies making long term fixes to their software, either by truly creating programming that would support a leap second or switching to a linear standard, they want to take the easy route and change the UTC standard. I believe we should keep the UTC standard aligned with UT1 (solar time) and that requires an occasional adjustment, just like a leap year. The great thing about the internet is it was built to define it’s own standards. If Meta, Google, Amazon, and others find their needs are different they can join together, create an Internet Standard via the RFC process convince their peers to adopt it go to town. That’s why it’s there, so let’s ask the tech companies to focus in their own universe if they need a different standard.

While they consider that, I hope you will join me in embracing the imperfections in our planet and solar system, support leap second and leave UTC alone.

I’m glad to have feedback. Tweet me @n4bfr with your thoughts.


Follow up: 8/2 at 3:20 PM – Found this tweet from @qntm with a tool to use TAI on Unix. Again, it’s a software problem.

How Long for Long Pi – Part 4 – Bring out the Raspberries

In the 4th post in this series (find post 3 with Win-tel stats here) I broke out the Raspberry Pi collection to see how this device has changes over the generations. I can say for sure it only gets better.

In 4 generations the Pi performance has improved from almost 19 hours to calculate Pi to 1 Million Places to just under 4 hours. That’s a 80% performance improvement in 8 years. Now the price has gone up, the Pi 4 as I have it was $75 vs the $25 of the Pi 1, but 4 times faster for less 3 times the price over those same 8 years is amazing to me.

I take the Pi 0 W results with a grain of salt because that’s supposed to be a smaller, less powerful board. But it costs $10 new. If you want to compare them by their different SOC’s Wikipedia has a great article that has all the specs.

I’m still a big Raspberry Pi fan and I probably could do more with a single Pi than I do, but I have a dozen in this room and they just crank along like magic. I don’t have one favorite project but one that you might want to read about is my Flip Dot Clock.

Today I have some older Apple machines on the bench. I’ll share those results tomorrow.

Raspberry Pi GPS Time Server with Bullseye

I’m into accurate time. Ever since I stumbled across the SatSignal.eu site I have been running a Raspberry Pi on my network as a Stratum 1 time server. For those not familiar with the stratum, the only level higher is Stratum 0 and that is reserved for the absolute standard of time sources like the National Institute of Technology clock and GPS Satellites.

2016 Raspberry Pi Clock showing leap second addition at the end of 2016

I had been having some entropy on my current set of 6 GPS clocks from various issues, so I decided to rebuild my clock from the base install of the new Raspbian Bullseye distribution. Since I didn’t see a single definitive source, I put this listing together and I’m glad to share it with the community because it has been good to me with previous builds. My sources include SatSignal.eu, tomasgreno.cz, and adafruit.com. Much of what I did is just compiling and changing the order of some steps slightly to minimize reboots. Those others may work better for you, but this version worked for me.

Let’s talk hardware. I have done this project with a Raspberry Pi 1 through a Pi 4 as well as the Pi Zero and Zero W. I prefer the form factor of the full sized Pi to go along with the GPS hardware, but as long as you can make the GPIO connections from the GPS to the Pi all should work.

For a GPS module I use the Adafruit Ultimate GPS with the following pin connections. If you want to use something different, consult the breakout manufacturer and use pinout.xyz to set the proper connections. For my connections I typically use:

GPS Breakout PinRaspberry Pi Pin
VIN (Voltage in)Pin 4 – 5V Power
GND (Ground)Pin 6 – Ground
RX (Receive, to get data from the Pi TX)Pin 8 – GPIO 14 – UART TX
TX (Transmit, to send data to the Pi RX)Pin 10 – GPIO 16 – UART RX
PPS (Pulse Per Second)Pin 12 – GPIO 18

It’s not a typo, make sure TX goes to RX on the other board and vice versa.

Now on to software. Start with a clean version of Raspbian Bullseye on an MicroSD. I downloaded mine from the official RaspberryPi .com website. I used the “Raspberry Pi OS with Desktop” version and used an 8 GB MicroSD card as the media. I’m skipping the items related to base configuration of the host name and other start-up items, there are other sources for that. All the commands you see will be via the command prompt.

The instructions from here forward assume you have a working Raspberry Pi, connected to the internet with the GPS attached.

  • Start by adding two additional lines to the /boot/config.txt file. This starts the process to disable Bluetooth on the Pi and sets the Pulse Per Second GPIO Pin if your GPS supports it.
    • Note in this document, the command following $ gets entered at the command prompt, other commands are entered inside the file, at the bottom on a new line is usually good. Once commands are entered, use Ctrl-X, Y and Enter to save and exit the file and return to the command prompt. And yes, I use NANO as my text editor. You should use what you want. I’m not a text editor drill sergeant.
$ sudo nano /boot/config.txt

#Changes for GPS Clock
dtoverlay=pi3-miniuart-bt
dtoverlay=pps-gpio,gpiopin=18 (Customize to appropriate pin)
  • Disable Bluetooth in system control
$ sudo systemctl disable hciuart
  • Add a reference to /etc/modules to software for PPS management we will install shortly.
$ sudo nano /etc/modules

pps-gpio
  • Run a complete set of updates to the Pi Software
$ sudo apt-get update
$ sudo apt-get dist-upgrade
$ sudo rpi-update
$ sudo reboot

Once the computer has rebooted, it’s time to begin installing the key software.

  • Install PPS tools and a set of system libraries
$ sudo apt-get install pps-tools
$ sudo apt-get install libcap-dev
$ sudo reboot
  • Now let’s test to see if the PPS software was installed by checking some OS boot logs
$ lsmod | grep pps 

You should get two responses back that look something like this. Don’t worry if the numbers are different.

$ dmesg | grep pps

Make sure you have a line that says “new PPS source…”

  • Once you see both of those, we can check and see if the GPS is sending data. Your GPS must have a “fix” which means it’s getting data from at least three satellites in order for this to work.
$ sudo ppstest /dev/pps0

Success looks like this:

Don’t worry about the specific numbers, just look for incrementing sequence numbers. The data will continue to populate every second until you hit CTRL-C to stop it.

  • Moving on, we have installed the GPS module and gotten data from part of it, but have not installed the main GPS software set yet. This should do it:
$ sudo apt-get install gpsd gpsd-clients gpsd-tools 

Once those are complete we can take a look at the data coming from the GPS by peeking at the port.

$ sudo cat /dev/ttyAMA0

You should get a continuing output with lines like this. I look for lines that start with $GPRMC (Specific location obscured by X’s)

pi@Telstar5A:~ $ sudo cat /dev/ttyAMA0
$GPGGA,220752.000,33XX.XXXX6,N,084XX.XXXX,W,1,07,1.13,278.6,M,-30.9,M,,*5E
$GPGSA,A,3,04,03,26,31,22,27,16,,,,,,1.46,1.13,0.92*0A
$GPRMC,220752.000,A,33XX.XXXX,N,084XX.XXXX,W,0.27,216.85,171121,,,A*7C
$GPZDA,220752.000,17,11,2021,,*51

Again, CTRL-C to stop it. If you get a stream of data and it’s gibberish your GPS may be sending at a different rate. A good place to start if you see that is this SatSignal.eu page which looks at other GPS modules and other methods.

  • Now, let’s temporarily send that data to some GPS software for interpretation.
$ sudo gpsd /dev/ttyAMA0 -n -F /var/run/gpsd.sock

Then we’ll open the GPSMON software to look. (There’s also a tool called CGPS. Use either, this is a personal preference thing)

$ gpsmon
Location obscured for privacy.

The screenshot above will tell you your exact position, the number of satellites your GPS sees, and the status of your PPS data all in one screen. Did I mention you CTRL-C to get out of a screen like this? Because you do.

  • Configure the GPS software to auto-start when you boot your machine. I have seen a couple of different processes, but this one works consistently for me.
$ sudo nano /etc/default/gpsd

Unlike the other file edits where you add a line, this is what the whole file should look like when you are done. You may just want to cut and paste this whole section, or type it in, whatever works for you, I won’t judge.

#Updated for GPS Pi Clock

START_DAEMON="true"

# Devices gpsd should collect to at boot time.

GPSD_SOCKET="/var/run/gpsd.sock"

# They need to be read/writeable, either by user gpsd or the group dialout.
DEVICES="/dev/ttyAMA0"

# Other options you want to pass to gpsd
GPSD_OPTIONS="-n"
GPSD_SOCKET="/var/run/gpsd.sock"

# Automatically hot add/remove USB GPS devices via gpsdctl
USBAUTO="false"
  • Almost done with the GPS section. Four more commands to go.
$ sudo systemctl stop gpsd.socket
$ sudo systemctl disable gpsd.socket
$ sudo ln -s /lib/systemd/system/gpsd.service /etc/systemd/system/multi-user.target.wants/
$ sudo reboot

That third $ command (between “disable” and “reboot” goes on a single line, this blog text tool wraps it. It should look like this:

  • If you want to reconfirm everything is working again after reboot, run GPSMON like above and look at the pretty data fly by. Now let’s connect the GPS to the clock. I’m choosing to use NTP as my time server software for this project. You might want to play with Chrony as well.
$ sudo apt-get install ntp

Once that is done, you want to stop the timesyncd service that is installed by default with Bullseye and replace it with NTP.

$ sudo systemctl stop systemd-timesyncd
$ sudo systemctl disable systemd-timesyncd
$ sudo service ntp stop
$ sudo service ntp startntp q -

Let’s test. “Out of the box” the NTP software checks with servers on the internet to get the time. It will look something like this:

$ ntpq -p -c rl
The * on the left indicates the chosen server, this one is at Georgia Tech.

Great news! Clock is syncing, but if you look at the bottom you’ll see after “leap=00” it says “stratum=2” which is nice, but we want to use the GPS to make it a Stratum 1 clock.

  • It’s time to cross the streams and point the NTP software to look at the GPS and PPS signals for time. That means editing the NTP configuration file.
$ sudo nano /etc/ntp.conf

There are a lot of other settings in the file, so I won’t give the whole file this time but here’s what I recommend. Scroll down until you get to this section:

Use the # sign as the beginning of a line to comment out several of those “debian.pool” lines. You do want to keep an internet server on the list as a backup and for diversity, but you won’t need all of them. Save that for the folks that don’t have satellite time at home. Just below the “pool” entries, add each of the 6 lines on a new line:

# Kernel-mode PPS reference-clock for the precise seconds
server 127.127.22.0 minpoll 4 maxpoll 4
fudge 127.127.22.0 refid PPS

# Coarse time reference-clock - nearest second
server 127.127.28.0 minpoll 4 maxpoll 4 iburst prefer
fudge 127.127.28.0 time1 +0.105 flag1 1 refid GPS

If you want to use different servers on the internet, there are plenty to supplement. The manual page about ntp.conf can tell you more about other things you can do with this file.

When your changes are made it should look like this.

Do that cool CTRL-X thing and get out of there before you break anything (kidding).

Time to get the NTP client to read the new configuration file.

$ sudo service ntp restart

It sometimes helps to reboot too. Your call.
Now let’s check and see what time source we are using:

$ ntpq -p -c rl

Success! Why? Three things you want to see on this screen:
1 – The SHM / .GPS. line has a * next to it, indicating it’s the primary time source. In the “st” column you can see a 0 which indicates it’s connected to a “Stratum 0” source.
2 – The PPS / .PPS. line has an o next to it, indicating it is a “PPS peer” and it’s getting very specific pulse data from the GPS signal. It’s also a “Stratum 0” source.
3 – The “stratum” field for your NTP server now is “stratum=1” which is pretty much the best you can get as a home user.

It may take a little bit for the PPS to settle in as the primary time source, so don’t worry if it doesn’t do it in the first 5 minutes.


So, that’s the project. Why do you need this? Well, I do it for fun, but there are several applications that require very accurate time. For instance in Ham Radio the cycles for a program like FT8 depend on an accurate clock to switch between receive and send modes. Is this the thing I’m going to replace a Rubidium time standard with? No, but for about $100 bucks it’s a nice thing to have an a good early project for someone learning about Raspberry Pi. You can set Windows, Mac or Linux clients to point to your home server for time instead of time.windows.com or other sources.

One final note, this is accurate for me as of the time in that last screen shot. Something is bound to change eventually, so expect these instructions to drift over time as things change. Figuring that out is one of the fun things for me.

If you do this project and want to share success, you can tweet me @N4BFR or find me in other place on the internet.

Solving Family Problems with Technology – The Pi/Flip Dot Alert System

Maybe this is a solution in search of a problem, but there are use cases. On occasion I will be down stairs in my Tech Center rocking out on some Ham Radio DX or writing some code for a Raspberry Pi and oblivious to the world. Those are usually the times when my wife Tammy is trying to get ahold of me, but is worried about interrupting me.

Introducing the Jim Alert system. It starts with the button on this Raspberry Pi Zero.

Tammy pushes the button which writes a file to a server which trips the LED on the Pi. This allows her to know the alert has been triggered.

Once every minute (for now) my flip dot clock will check for that file. If it finds it, it will trigger a custom message on the clock and an alert sound. (Literally, ALERT in Morse Code). Here’s what it looks like…

Once the alert displays, the LED on the Pi Zero goes off and it clears from the Flip Dot in about 30 seconds, at the top of the next minute.

A possible future enhancement might be to add multiple Pi’s and show the room the alert came from.

For more on my Flip Dot project, read here:

Building a Flip Dot Clock powered by a Raspberry Pi

Flip Dot clock as part of my clock wall.

It’s a nice confluence of my fandoms, I love old technology, I love clocks and I love Raspberry Pi’s, so when I found a Luminator 7×90 Flip Dot display on eBay in early January, I bought it. This is the fairly-detailed, well illustrated story of how I brought a 90’s sign together with a low cost but powerful computer.

Continue reading “Building a Flip Dot Clock powered by a Raspberry Pi”

My Raspberry Pi version of the Big Ben Clock

Last winter, early post retirement, I was tinkering around with one of my many clocks one day and added the chimes of Big Ben to it. Whenever I would visit my grandparents growing up, I would hear their clock that struck the Windsor Chimes and I always thought that would be a fun project.

This was fairly straightforward, I grabbed some sound files from the UK Parliament website and one other source for the 45 minute chime, and did a little editing. Work done implemented via CRON in a couple of hours, fast forward on to other things.

A few months later and I am on the phone with my mother and she hears the chimes in the background. She starts reminiscing about the sounds and her parents clock and I agree to make something for her.

This video documents the major elements of the build but here’s the parts list:

– Raspberry Pi Model 3 B with Raspberry Pi Touch Screen – I have had good luck with Canakit and Adafruit if you are looking for sources.
Basic USB Powered Speakers
Micro USB Power Cable with switch
16 GB SanDisk Class 10 Micro SD Card
– 1/4 inch Birch Veneer Plywood
– Gloss White Spray Paint

The Software Build

I had all the sound files to go on from my build into my exciting digital clock, so no additional work done there. One tricky bit was to get the hourly chime to trigger at about 59:40 after the hour so the big ben bell would start striking the hour right at the top of the minute. Since CRON works on minutes, I solved that by making a 59 second file. So the file starts at 59 after but plays a silent section for the first 40 seconds before the chime.

How the hourly Big Ben bell plays: CRON is programmed at xx:59 to trigger a shell script that first plays the chimes, this is the file mentioned above. It then triggers the Big Ben bell sound, and loops the appropriate number of times for each hour. Here’s an example of the code for 9 o’clock. There are 12 files, 1 for each hour.

#!/bin/bash
#export XDG_RUNTIME_DIR="/run/user/1000"
mplayer -really-quiet "/home/pi/chime/h59.mp3" -volume 100
mplayer -really-quiet "/home/pi/chime/bong.mp3" -loop 9 -volume 100

A couple of new skills for me were achieved on this project. The first was working with JavaScript clock elements for an analog clock. This came together by adding the face of the Great Clock as a background image, editing the photo for size and removing the hands from the face. I then found some similar looking clock hands and did a JavaScript analog clock overlay via HTML. Adjusting the pivot points for the hands took some time, they would drift around the clock face until set just right.

The other element to this was hardening it so it was hands off for mom. With her being 1,000 miles away, I couldn’t do a local install so it had to be right. I had her send me her WiFi info so I could pre-program it on the card. I chose USB powered speakers with an on-cord volume control so she could just lift the touch screen off the case to adjust. Also added a “kill switch” to the back for easy shut down. Finally I included a backup USB card in the case incase the current one is corrupted and I keep an image on my NAS as well if needed.

I did not put a RTC in the Pi. Partially because some of the GPIO ports I wanted we used by the Touch Screen and partly because I had the clock programmed to get NTP time via WiFi so there would be no updating needed.

The Hardware Build

I started with the standard elements I knew the Raspberry Pi 3B+. I chose the B+ because I didn’t need the horsepower of a Pi 4 for a basic display and I had one I had recently swapped out for a Pi 4 on another project. I used the 16 GB Class 10 MicroSD cards in all my Pi projects. They rarely corrupt for me when powered correctly, they offer enough space to power most projects I do, and the are small enough to back up on my NAS without completely killing storage.

I’ve used the Pi Touch Screen in a couple of other projects and it’s very easy to set up and control the display natively. In most cases I also use a commercial Pi Touch Screen stand however in this case I wanted to hide the electronics and let the clock be the focal point.

I tried to build a simple box that would hold the Pi, Screen and Speakers and I accomplished it, but I might do it differently in the future. I assembled the 4 structural elements first, the 2 sides, back and the bottom. Small birch strips held the front out from the back of the box to provide a little extra room.

On the first attempt, I made the face frame from a single piece of plywood cut in 2, so I could notch out the hole to mount the touch screen. I wasn’t really happy with the fit or the structural integrity of that, so I started with another single piece, made a small slat through which I could cut a hole for the screen with my band saw and then used putty to seal the small gap, which worked much better.

Several other holes in the box to allow for air flow, speaker audio to escape and power. I was going to put some grommets on the rough wooden holes I cut in the back but I had to give that up for time so I could get it to Mom by Christmas.

Great news is that it arrived on time and worked perfectly. We plugged it in about 10 minutes to one and by 12:59 it had synced up with the NTP server for a real time update and was playing it’s chimes.

Before it comes up

I intentionally have not packaged this all up as a GitHub project or some other repository. I don’t own the rights to all the photos or sound files. Hopefully your build will use all the open source stuff!

Other questions on my build? Contact me on Social Media…

– Facebook: facebook.com/N4BFRVision
– Twitter: @N4BFRVision
– Reddit: u/N4BFR

I was not paid in any way for this build or post. Some of the links in this post lead to shopping sites, however I make no commission. If this post helped or inspired you, consider dropping something in my tip jar.

The Russian Submarine Clock

During the Blue Ridge Parkway road trip last year I found this mechanical clock with a Russian Submarine design right down to the CCCP in the lower right corner. When I picked it up, it was working OK but seemed to run down quickly until it stopped. I took it in to Bowers Watch and Clock Repair in Atlanta and they ended up restoring it to full functionality for about half of what the original estimate was.

Great, but the fascinating part of the story was talking to the senior Mr. Bowers (it’s a father and son business) who told me that, “no Russian captain would have that poor quality clock on their ship.” He went on to tell me these were made for the tourist trade. Fair enough.

Mr. Bowers went on to tell me about the Ansonia Clock Company, which was started not far from where I grew up in Connecticut, though about 100 years earlier than when I lived there. Eventually Ansonia was sold to Amtorg Trading which moved the machine shop to Russia. According to Mr. Bowers, “one lathe operator said they took everything from the floorboards on up. When they started the steam boiler in Moscow it still had American water in the tank. The lathe had the same piece in it and the trash in the trash can was the same.” Quite a statement! (Note, I typed that quote from memory so there may be a little paraphrasing in it.)

So, is it real or repro? Probably 70’s repro would be my guess judging by some other blog posts. If you want one new, here’s one https://www.russian-watches.info/shop/vostok-watches/russian-vostok-ship-marine-8-days-clock-5-chm-submarine/ for about $300. Note on the dial between the 5 and 6 digit mine cays B CCCP, while the one I linked says POCCHH. I think this clock is likely an early clock that was actually on a ship. Something to watch for in future shopping trips.

Solution for displaying Pocket Watches & Stop Watches

As a watch fan, I have collected a few stop watches and pocket watches but I have struggled on how to display them. Looking at the brass frame I built for the Nixie Clock (See it in the 24 Hours of Clock Videos) I thought I could use the same material to crate a watch holder. It only takes 3 parts and 4 tools:

  • A piece of wood for the base (and a saw to cut it to size)
  • 3/32″ brass (and some wire cutters to trim)
  • Solder (and a Soldering Iron)
  • A drill to create the mounting holes

24 Hours of Clocks Video Project

I admit it. I have a thing for clocks. So I took some of my favorite clocks and put together a video montage to showcase these interesting time pieces. What kind of clocks:

  • A Sony Flip Clock tells the time from 2-4 AM. This clock radio was on so many bedside tables back in the day. It evokes the movie Groundhog Day when Phil wakes up to Sonny & Cher every morning.
  • James Remind-O-Timer. A took for the later day 50’s and 60’s hotel desk clerk. Need a 5:50 AM wake-up call? No problem, just flip the lever to 5:50 and the buzzer will remind you.
  • Heathkit GC1005. When I worked in radio in the 80’s, these were a staple of every studio.
  • Raspberry Pi GPS clock. When you need super accurate time wherever you go. It’s my home made favorite and I use it when I want to do time sensitive digital modes on the road.
  • Chelsea Military Clock. One of my all time favorites. A beautiful 7 day mechanical movement (that needs a little fine tuning) that looks in place in any bridge, hanger or ward room.

Coca-Cola Pizza Shop Clock Repair

I was at a yard sale on Saturday and had the opportunity to grab this 1986 LED clock that looks like it would be perfectly in place in a Pizza Shop that you would watch while waiting to pick up a pie for the family. Primarily the restoration was about reattaching the Coke sign and some minor clean up. Now to decide where this one will live.