

I’m into accurate time. Ever since I stumbled across the SatSignal.eu site I have been running a Raspberry Pi on my network as a Stratum 1 time server. For those not familiar with the stratum, the only level higher is Stratum 0 and that is reserved for the absolute standard of time sources like the National Institute of Technology clock and GPS Satellites.
I had been having some entropy on my current set of 6 GPS clocks from various issues, so I decided to rebuild my clock from the base install of the new Raspbian Bullseye distribution. Since I didn’t see a single definitive source, I put this listing together and I’m glad to share it with the community because it has been good to me with previous builds. My sources include SatSignal.eu, tomasgreno.cz, and adafruit.com. Much of what I did is just compiling and changing the order of some steps slightly to minimize reboots. Those others may work better for you, but this version worked for me.
Let’s talk hardware. I have done this project with a Raspberry Pi 1 through a Pi 4 as well as the Pi Zero and Zero W. I prefer the form factor of the full sized Pi to go along with the GPS hardware, but as long as you can make the GPIO connections from the GPS to the Pi all should work.
For a GPS module I use the Adafruit Ultimate GPS with the following pin connections. If you want to use something different, consult the breakout manufacturer and use pinout.xyz to set the proper connections. For my connections I typically use:
| GPS Breakout Pin | Raspberry Pi Pin |
| VIN (Voltage in) | Pin 4 – 5V Power |
| GND (Ground) | Pin 6 – Ground |
| RX (Receive, to get data from the Pi TX) | Pin 8 – GPIO 14 – UART TX |
| TX (Transmit, to send data to the Pi RX) | Pin 10 – GPIO 16 – UART RX |
| PPS (Pulse Per Second) | Pin 12 – GPIO 18 |
It’s not a typo, make sure TX goes to RX on the other board and vice versa.
Now on to software. Start with a clean version of Raspbian Bullseye on an MicroSD. I downloaded mine from the official RaspberryPi .com website. I used the “Raspberry Pi OS with Desktop” version and used an 8 GB MicroSD card as the media. I’m skipping the items related to base configuration of the host name and other start-up items, there are other sources for that. All the commands you see will be via the command prompt.
The instructions from here forward assume you have a working Raspberry Pi, connected to the internet with the GPS attached.
- Start by adding two additional lines to the /boot/config.txt file. This starts the process to disable Bluetooth on the Pi and sets the Pulse Per Second GPIO Pin if your GPS supports it.
- Note in this document, the command following $ gets entered at the command prompt, other commands are entered inside the file, at the bottom on a new line is usually good. Once commands are entered, use Ctrl-X, Y and Enter to save and exit the file and return to the command prompt. And yes, I use NANO as my text editor. You should use what you want. I’m not a text editor drill sergeant.
$ sudo nano /boot/config.txt

#Changes for GPS Clock
dtoverlay=pi3-miniuart-bt
dtoverlay=pps-gpio,gpiopin=18 (Customize to appropriate pin)
- Disable Bluetooth in system control
$ sudo systemctl disable hciuart
- Add a reference to /etc/modules to software for PPS management we will install shortly.
$ sudo nano /etc/modules

pps-gpio
- Run a complete set of updates to the Pi Software
$ sudo apt-get update
$ sudo apt-get dist-upgrade
$ sudo rpi-update
$ sudo reboot
Once the computer has rebooted, it’s time to begin installing the key software.
- Install PPS tools and a set of system libraries
$ sudo apt-get install pps-tools
$ sudo apt-get install libcap-dev
$ sudo reboot
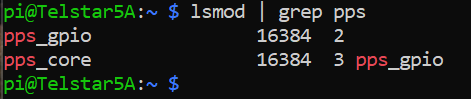
- Now let’s test to see if the PPS software was installed by checking some OS boot logs
$ lsmod | grep pps
You should get two responses back that look something like this. Don’t worry if the numbers are different.
$ dmesg | grep pps
Make sure you have a line that says “new PPS source…”

- Once you see both of those, we can check and see if the GPS is sending data. Your GPS must have a “fix” which means it’s getting data from at least three satellites in order for this to work.
$ sudo ppstest /dev/pps0
Success looks like this:
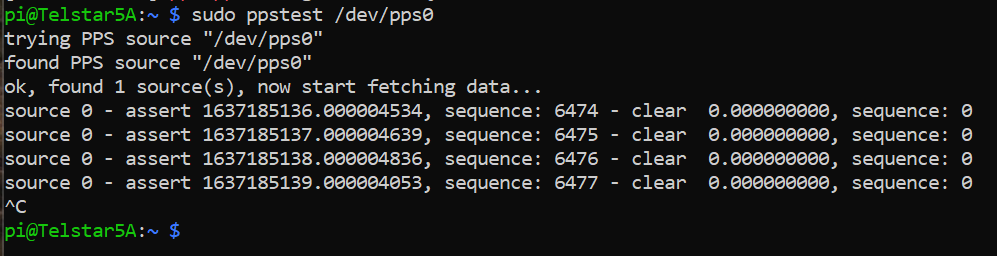
Don’t worry about the specific numbers, just look for incrementing sequence numbers. The data will continue to populate every second until you hit CTRL-C to stop it.
- Moving on, we have installed the GPS module and gotten data from part of it, but have not installed the main GPS software set yet. This should do it:
$ sudo apt-get install gpsd gpsd-clients gpsd-tools
Once those are complete we can take a look at the data coming from the GPS by peeking at the port.
$ sudo cat /dev/ttyAMA0
You should get a continuing output with lines like this. I look for lines that start with $GPRMC (Specific location obscured by X’s)
pi@Telstar5A:~ $ sudo cat /dev/ttyAMA0
$GPGGA,220752.000,33XX.XXXX6,N,084XX.XXXX,W,1,07,1.13,278.6,M,-30.9,M,,*5E
$GPGSA,A,3,04,03,26,31,22,27,16,,,,,,1.46,1.13,0.92*0A
$GPRMC,220752.000,A,33XX.XXXX,N,084XX.XXXX,W,0.27,216.85,171121,,,A*7C
$GPZDA,220752.000,17,11,2021,,*51
Again, CTRL-C to stop it. If you get a stream of data and it’s gibberish your GPS may be sending at a different rate. A good place to start if you see that is this SatSignal.eu page which looks at other GPS modules and other methods.
- Now, let’s temporarily send that data to some GPS software for interpretation.
$ sudo gpsd /dev/ttyAMA0 -n -F /var/run/gpsd.sock
Then we’ll open the GPSMON software to look. (There’s also a tool called CGPS. Use either, this is a personal preference thing)
$ gpsmon
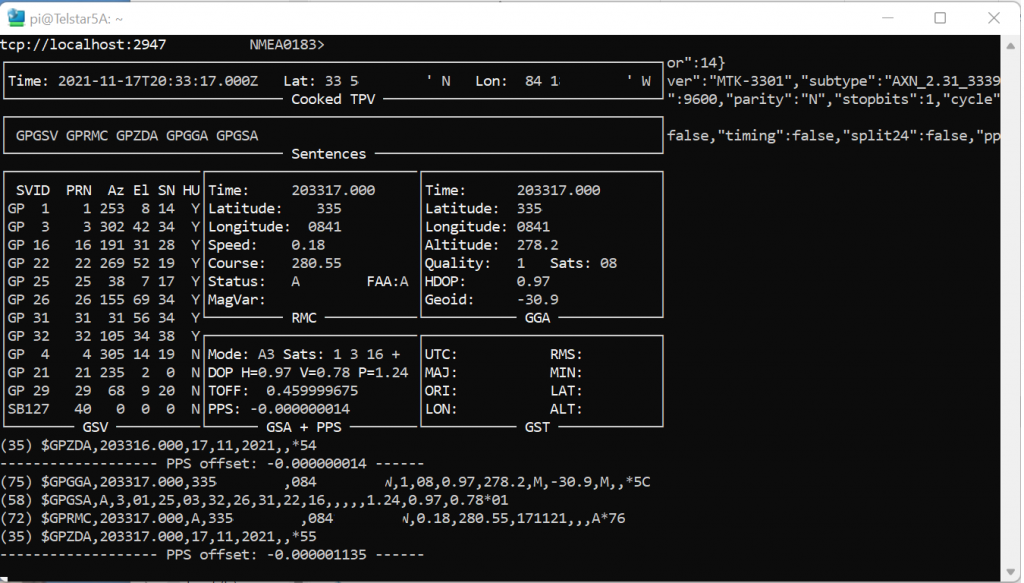
The screenshot above will tell you your exact position, the number of satellites your GPS sees, and the status of your PPS data all in one screen. Did I mention you CTRL-C to get out of a screen like this? Because you do.
- Configure the GPS software to auto-start when you boot your machine. I have seen a couple of different processes, but this one works consistently for me.
$ sudo nano /etc/default/gpsd
Unlike the other file edits where you add a line, this is what the whole file should look like when you are done. You may just want to cut and paste this whole section, or type it in, whatever works for you, I won’t judge.
#Updated for GPS Pi Clock

START_DAEMON="true"

# Devices gpsd should collect to at boot time.

GPSD_SOCKET="/var/run/gpsd.sock"

# They need to be read/writeable, either by user gpsd or the group dialout.
DEVICES="/dev/ttyAMA0"

# Other options you want to pass to gpsd
GPSD_OPTIONS="-n"
GPSD_SOCKET="/var/run/gpsd.sock"

# Automatically hot add/remove USB GPS devices via gpsdctl
USBAUTO="false"
- Almost done with the GPS section. Four more commands to go.
$ sudo systemctl stop gpsd.socket
$ sudo systemctl disable gpsd.socket
$ sudo ln -s /lib/systemd/system/gpsd.service /etc/systemd/system/multi-user.target.wants/
$ sudo reboot
That third $ command (between “disable” and “reboot” goes on a single line, this blog text tool wraps it. It should look like this:

- If you want to reconfirm everything is working again after reboot, run GPSMON like above and look at the pretty data fly by. Now let’s connect the GPS to the clock. I’m choosing to use NTP as my time server software for this project. You might want to play with Chrony as well.
$ sudo apt-get install ntp
Once that is done, you want to stop the timesyncd service that is installed by default with Bullseye and replace it with NTP.
$ sudo systemctl stop systemd-timesyncd
$ sudo systemctl disable systemd-timesyncd
$ sudo service ntp stop
$ sudo service ntp startntp q -
Let’s test. “Out of the box” the NTP software checks with servers on the internet to get the time. It will look something like this:
$ ntpq -p -c rl
Great news! Clock is syncing, but if you look at the bottom you’ll see after “leap=00” it says “stratum=2” which is nice, but we want to use the GPS to make it a Stratum 1 clock.
- It’s time to cross the streams and point the NTP software to look at the GPS and PPS signals for time. That means editing the NTP configuration file.
$ sudo nano /etc/ntp.conf
There are a lot of other settings in the file, so I won’t give the whole file this time but here’s what I recommend. Scroll down until you get to this section:
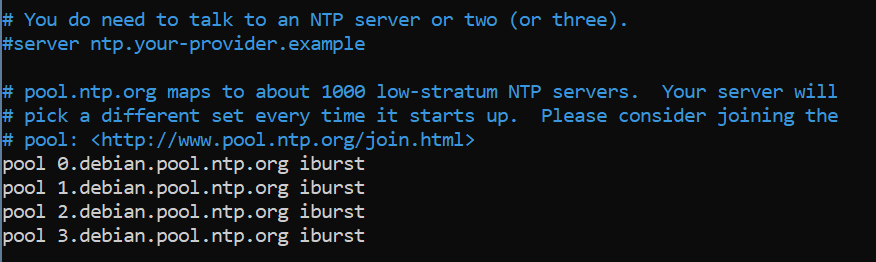
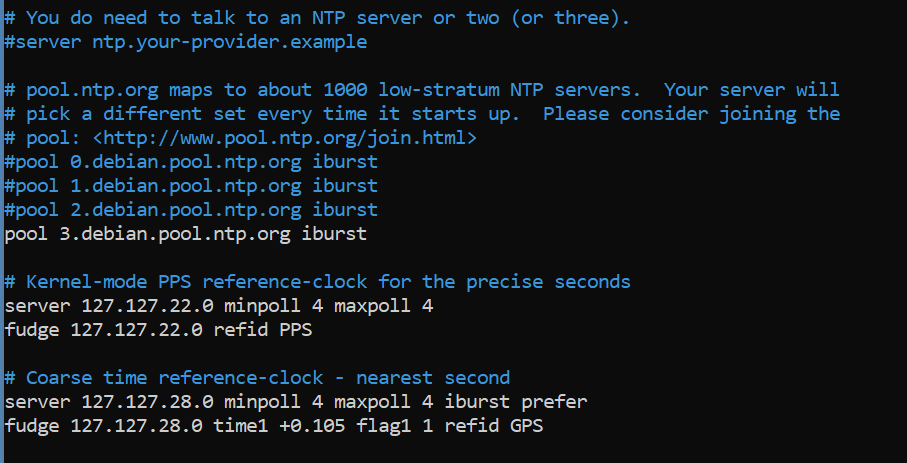
Use the # sign as the beginning of a line to comment out several of those “debian.pool” lines. You do want to keep an internet server on the list as a backup and for diversity, but you won’t need all of them. Save that for the folks that don’t have satellite time at home. Just below the “pool” entries, add each of the 6 lines on a new line:
# Kernel-mode PPS reference-clock for the precise seconds
server 127.127.22.0 minpoll 4 maxpoll 4
fudge 127.127.22.0 refid PPS

# Coarse time reference-clock - nearest second
server 127.127.28.0 minpoll 4 maxpoll 4 iburst prefer
fudge 127.127.28.0 time1 +0.105 flag1 1 refid GPS
If you want to use different servers on the internet, there are plenty to supplement. The manual page about ntp.conf can tell you more about other things you can do with this file.
When your changes are made it should look like this.
Do that cool CTRL-X thing and get out of there before you break anything (kidding).
Time to get the NTP client to read the new configuration file.
$ sudo service ntp restart
It sometimes helps to reboot too. Your call.
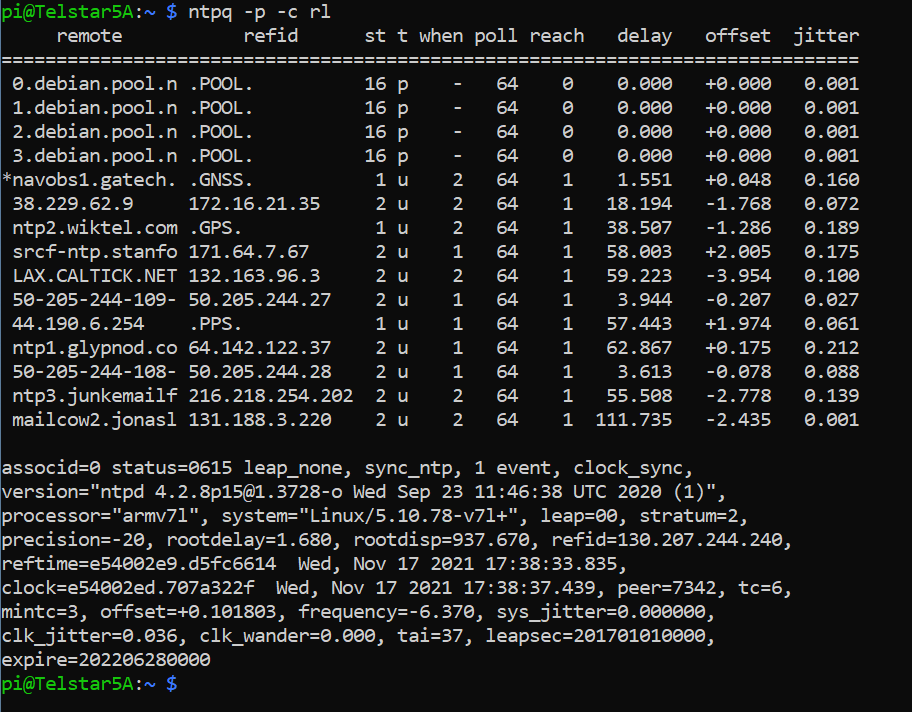
Now let’s check and see what time source we are using:
$ ntpq -p -c rl
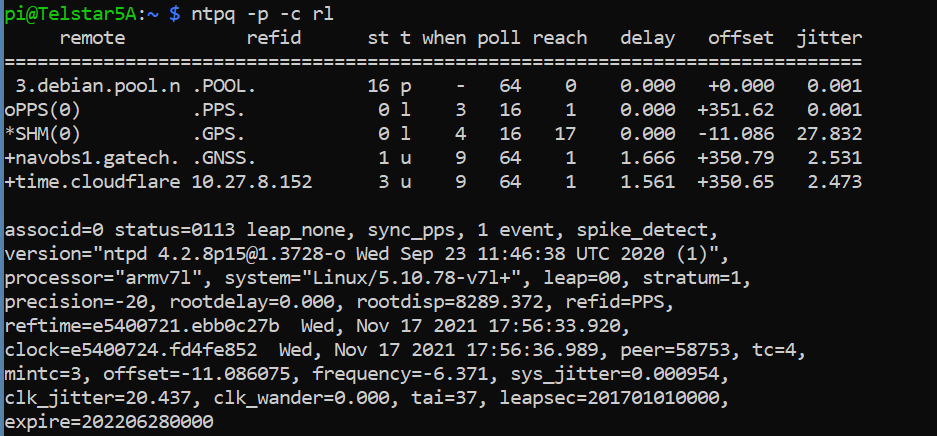
Success! Why? Three things you want to see on this screen:
1 – The SHM / .GPS. line has a * next to it, indicating it’s the primary time source. In the “st” column you can see a 0 which indicates it’s connected to a “Stratum 0” source.
2 – The PPS / .PPS. line has an o next to it, indicating it is a “PPS peer” and it’s getting very specific pulse data from the GPS signal. It’s also a “Stratum 0” source.
3 – The “stratum” field for your NTP server now is “stratum=1” which is pretty much the best you can get as a home user.
It may take a little bit for the PPS to settle in as the primary time source, so don’t worry if it doesn’t do it in the first 5 minutes.
So, that’s the project. Why do you need this? Well, I do it for fun, but there are several applications that require very accurate time. For instance in Ham Radio the cycles for a program like FT8 depend on an accurate clock to switch between receive and send modes. Is this the thing I’m going to replace a Rubidium time standard with? No, but for about $100 bucks it’s a nice thing to have an a good early project for someone learning about Raspberry Pi. You can set Windows, Mac or Linux clients to point to your home server for time instead of time.windows.com or other sources.
One final note, this is accurate for me as of the time in that last screen shot. Something is bound to change eventually, so expect these instructions to drift over time as things change. Figuring that out is one of the fun things for me.
If you do this project and want to share success, you can tweet me @N4BFR or find me in other place on the internet.